

Operations
MannaCRM operations guide
Every screen of the operations dashboard, annotated: how orders arrive, how they reach drivers, and how the day gets closed and paid.
What MannaCRM runs#
MannaCRM is the operations control room for Huper Express deliveries in Singapore. Orders flow in from the partner POS automatically; the CRM assigns them to drivers by postal-code zone, tracks every delivery live on a map, and settles driver payouts at month end. The driver app (drive.huper.express) is the other half of the system: everything a driver does there shows up here within seconds.
| Rhythm | What happens |
|---|---|
| Every 5 min, 04:00–23:00 | POS sync pulls new and updated orders, then auto-assigns them to drivers by zone (postal prefix). The dashboard's Sync & Assign button triggers the same run on demand. |
| Morning | Drivers start shifts in the driver app, scan every package barcode at the warehouse, and head out. Leaving the warehouse geofence marks jobs out for delivery. |
| All day | AM then PM time slots. Supervisors watch the dashboard map, rebalance overloaded drivers, message drivers over WhatsApp, and handle failures. |
| Midnight | The close-day job finalises the date: anything not delivered is marked failed (“auto-closed: not completed by end of day”) and becomes tomorrow's redelivery / follow-up work. |
| Monthly | Payout periods are generated from delivered orders and approved in the Payouts screen. |
In the daily flow
Keep this open on the ops desk: Dashboard for live state, Orders for digging into a specific delivery, Reports for the day-end story.
Watch out
The CRM owns delivery data only. Sales and accounting live in the POS. Never re-key financial figures here.
Signing in#
Staff sign in with their Huper email and password. What you can see is decided by the role on your staff record: admins get everything including settings and payouts; supervisors get day-to-day operations. Drivers cannot log in here; their app lives at drive.huper.express.
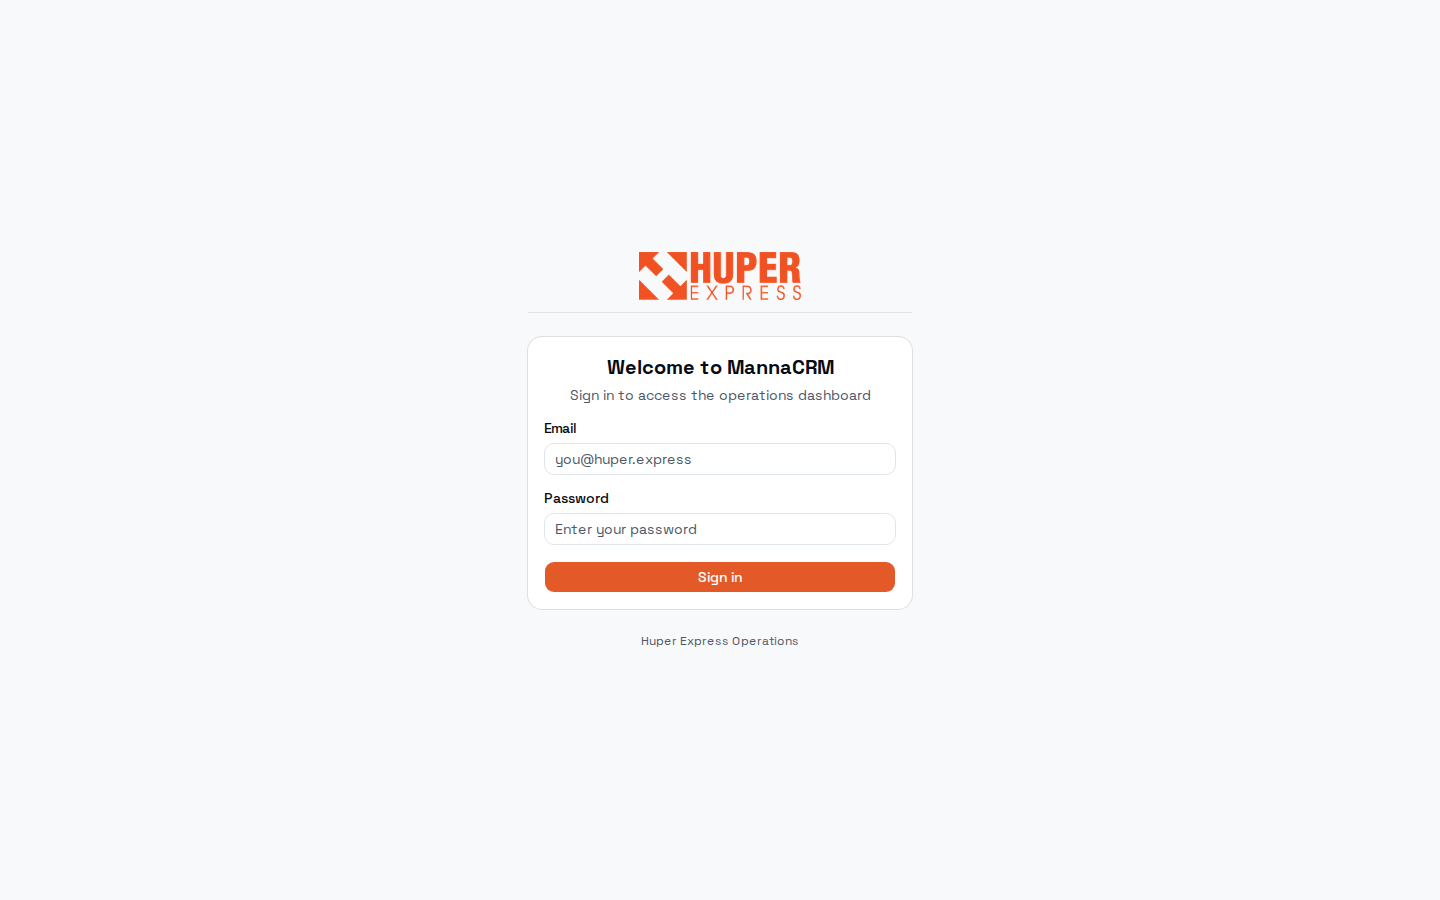
- Email + password
Use your @huper.asia / @huper.express account. Accounts are created by an admin in the Staff screen. There is no self-service sign-up.
- Sign in
After signing in you land on the Operations Dashboard. Sessions persist on the ops machines; log out from the header icon when leaving a shared computer.
Watch out
If a page redirects you back to the dashboard, your role does not allow it (settings pages are admin-only). Ask an admin rather than sharing accounts.
Operations Dashboard, the control room#
One screen answers: how is today going? The KPI strip counts today's home deliveries and outlet runs by status; the map shows every stop, clustered and coloured by route; and the action buttons cover the four things supervisors do most.
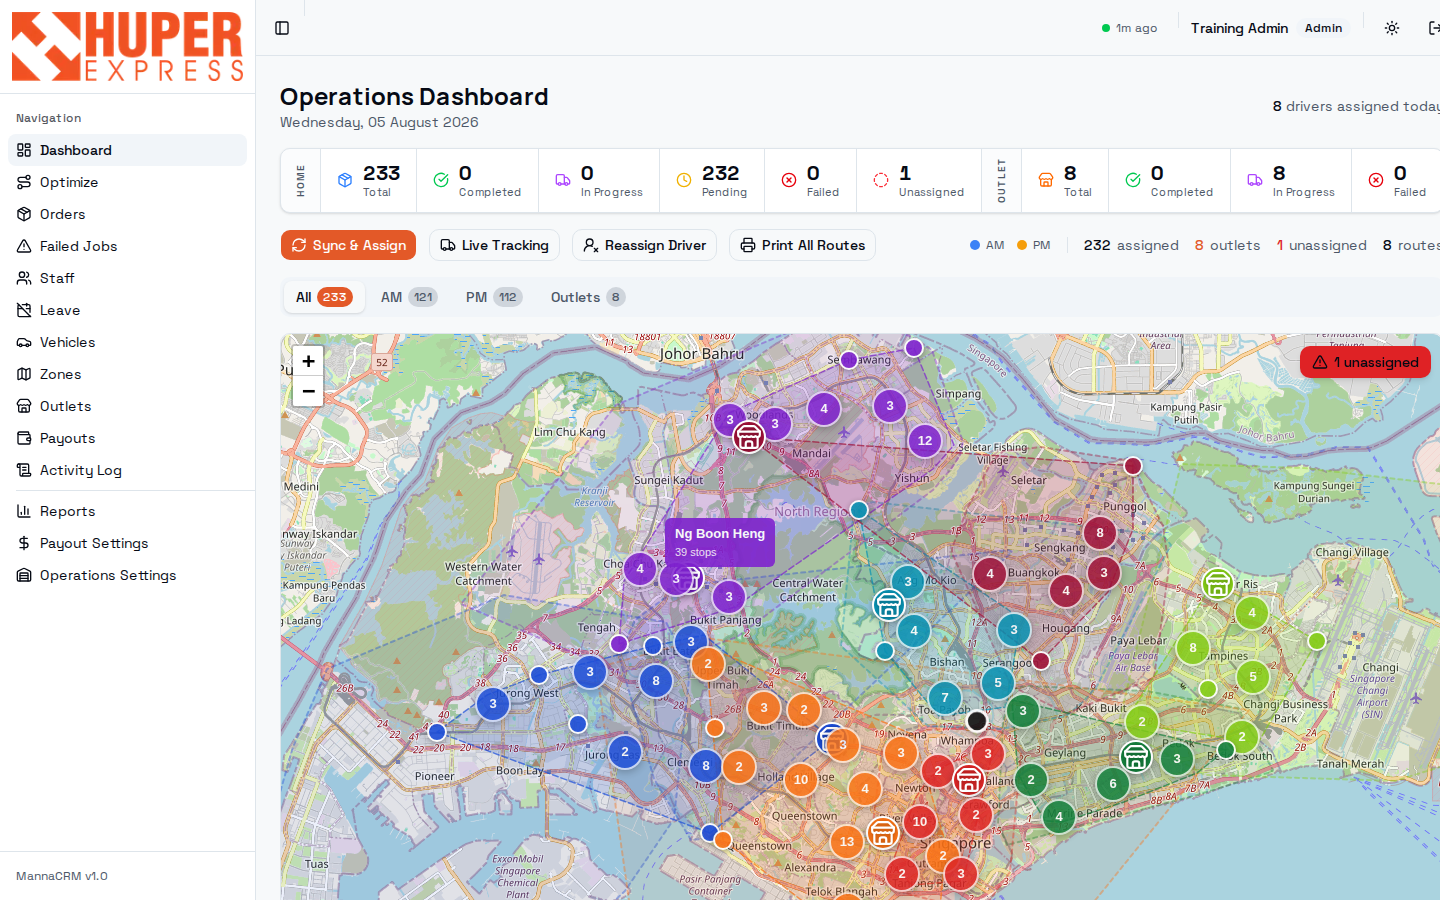
- Navigation sidebar
Every screen in this guide, top to bottom. The bottom group (Reports, Payout Settings, Operations Settings) is admin territory.
- HOME delivery counters
Today's door-to-door orders: Total, Completed, In Progress, Pending, Failed, Unassigned. Unassigned > 0 is your first fix of the morning: those orders have no driver.
- OUTLET counters
The same idea for outlet restocking runs (Total / Completed / In Progress / Failed). Outlet runs come from the weekly roster on the Outlets screen.
- Sync & Assign
Manually triggers the POS pull + zone auto-assign right now, instead of waiting for the next 5-minute tick. Use it after fixing a zone or driver so new orders assign immediately.
- Live Tracking
Toggles live driver GPS positions onto the map (see Live tools below).
- Reassign Driver
Bulk-move stops from one driver to another: the tool for sickness, breakdowns, or rebalancing an overloaded route mid-day.
- Print All Routes
Landscape A4 run sheets, one section per driver, addresses resolved from the postal-code database. Print before the vans leave.
- All / AM / PM / Outlets tabs
Filter the map and counters by time slot. Deliveries run in AM and PM windows only (no Sunday operations).
- The map
Each numbered bubble is a cluster of stops; colour = route/driver, shop icons = outlets. Zoom in and bubbles split into individual stops. Hover a route to see the driver and stop count.
- Unassigned alert
A red badge floats over the map whenever orders lack a driver. Click through and fix by adjusting zones or assigning manually in Orders.
- Header status
Green dot + “1m ago” = data freshness; the toggle switches light/dark; the last icon logs out. If the dot goes stale, check the POS sync.
In the daily flow
Morning: open dashboard → clear Unassigned → Sync & Assign → Print All Routes. Midday: watch Failed and In Progress. Evening: confirm Completed matches Total.
Watch out
Numbers reset per day. If Total looks wrong at 06:00, the POS sync may not have run. Check with a manual Sync & Assign before escalating.
Live Tracking and Reassign Driver#
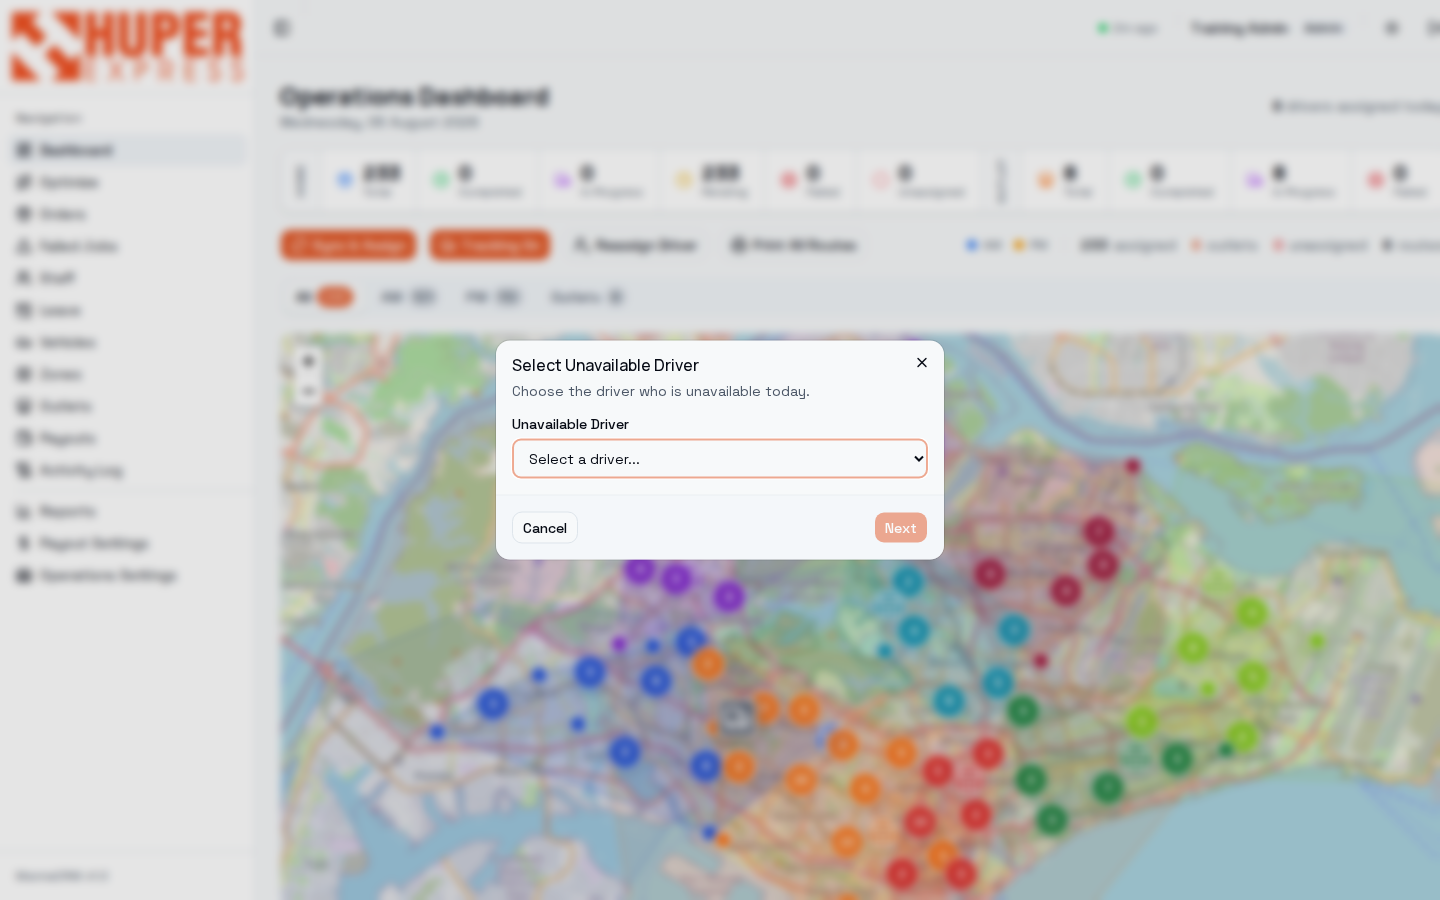
The two mid-day tools. Live Tracking turns the map into a fleet view: every on-shift driver's van appears at their last GPS position. Reassign Driver moves a sick or stuck driver's remaining workload to colleagues in two steps.
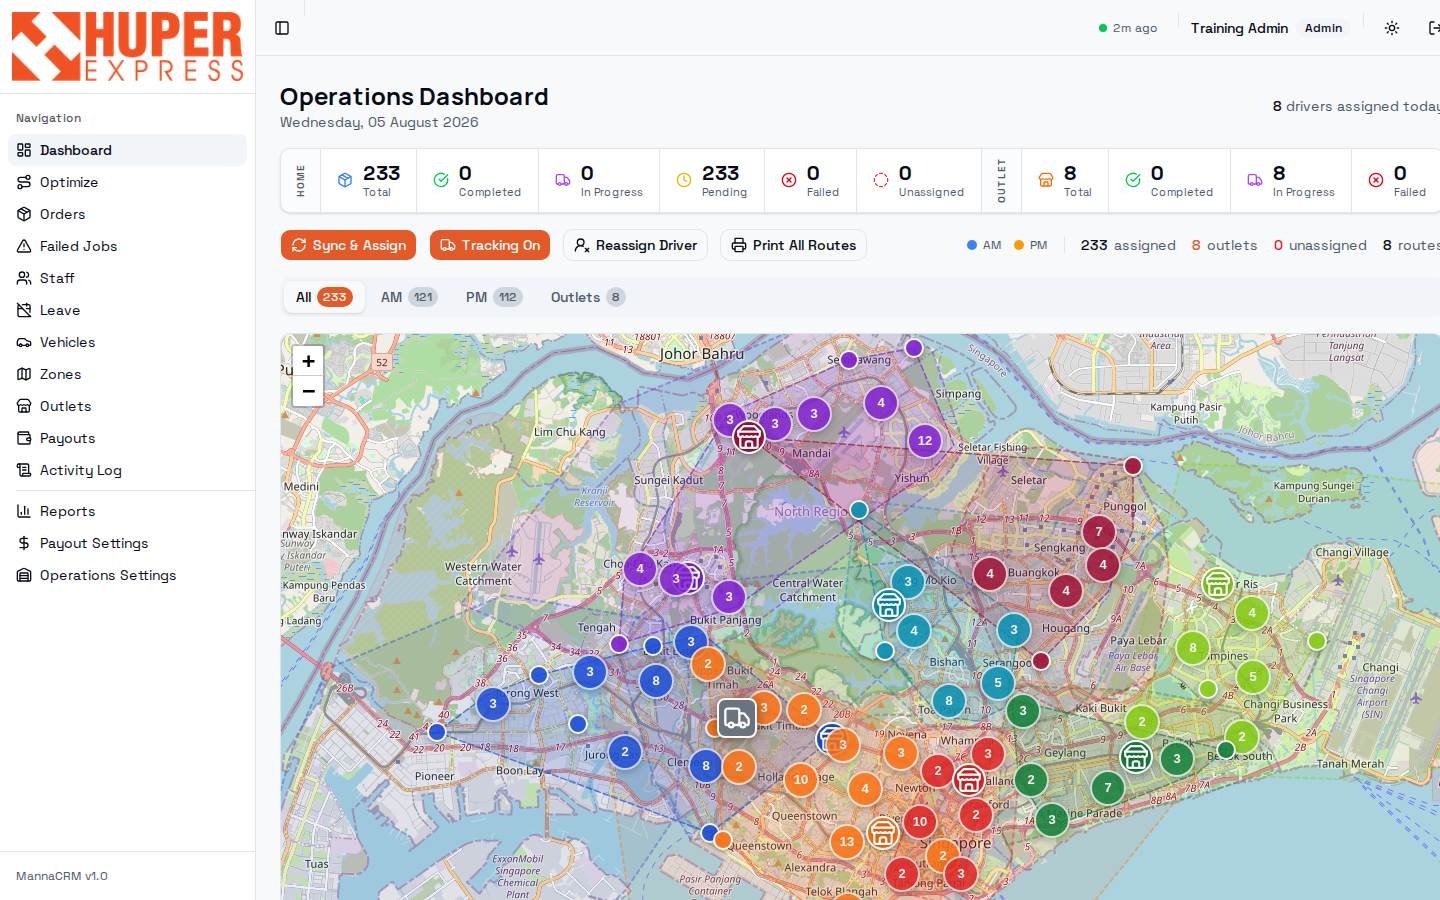
- Tracking On
The button turns orange while tracking is active. Positions come from the driver app's GPS pings (roughly every 5 minutes while a driver is on shift).
- Van icons
Each van is a live driver; here a van sits at the Toh Tuck warehouse. A van that hasn't moved between stops for a long time is your cue to call.
- Select the unavailable driver
Reassign starts by asking who is out. The dropdown shows each driver's current workload, e.g. “Ganesan (AM: 28 orders, 1 outlet | PM: 24 orders)”, so you can see the size of what you're about to move.
- Choose recipients
The next step spreads the orders across the drivers you pick. Assignments update immediately; affected drivers get the new stops on their next app sync.
- Confirm and verify
After reassigning, glance at Driver Load: the recipient's bar must stay out of the red, or you have traded one problem for another.
In the daily flow
Driver calls in sick at 09:00 with half a route left: Reassign Driver → pick them → spread stops → Sync & Assign → tell the receiving drivers to pull-refresh.
Driver Load: balance before it hurts#
Scroll below the map for the same day expressed per driver. Each bar is one driver's assigned stops against the 40-stop capacity line; the packages column shows physical load. This is where you catch an unfair or undeliverable day before drivers do.
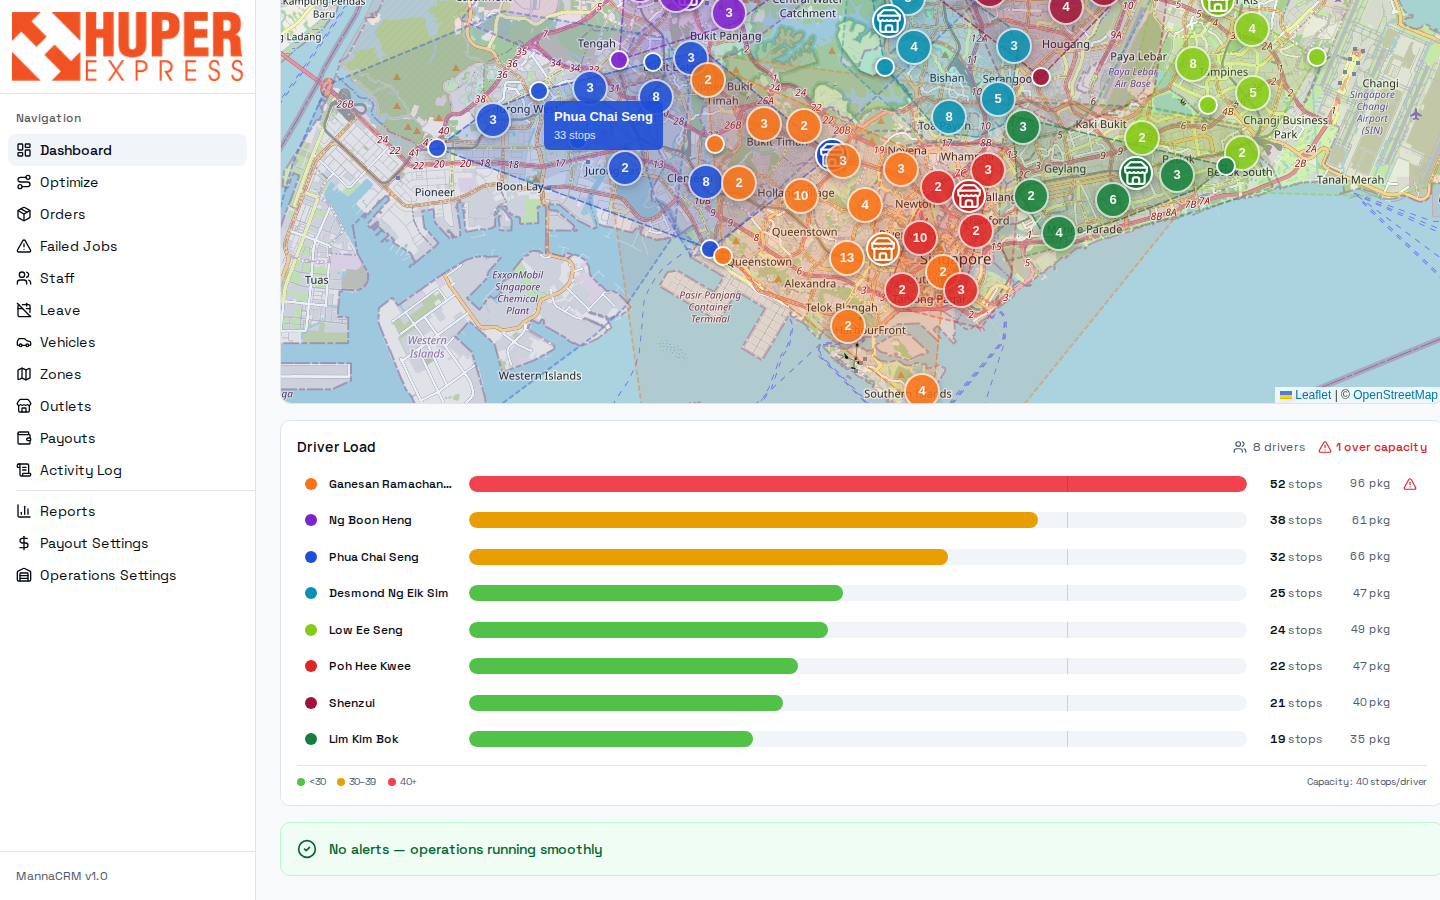
- Map tooltips
Hovering a route shows the driver name and stop count in place: a quick sanity check without leaving the map.
- Over-capacity flag
“1 over capacity”: at least one driver exceeds 40 stops. Here Ganesan carries 52 stops / 96 packages; his bar runs red.
- Per-driver bars
Green under 30 stops, amber 30–39, red 40+. Click a driver to highlight their stops; use Reassign Driver to move a chunk to a lighter route.
- Legend
The thresholds are printed so the colours mean the same thing to everyone.
- Alerts banner
Aggregated operational alerts (late warehouse departures, stuck routes). Green “No alerts” means the system sees nothing abnormal right now.
In the daily flow
Check right after the 06:00 assignment settles and again before the PM slot begins.
Watch out
Capacity is stops, not packages: 30 stops of bulky 7-packet orders can be harder than 45 singles. Use the pkg column as the tie-breaker when rebalancing.
Orders: every delivery, searchable#
The full order book. Orders arrive from the POS with tracking number, customer, address and payment terms already attached; the CRM adds driver, status and proof of delivery. This capture is filtered to one day and shows the live lifecycle: Out for Delivery, Delivered, and Pending Pickup rows carried by real drivers.
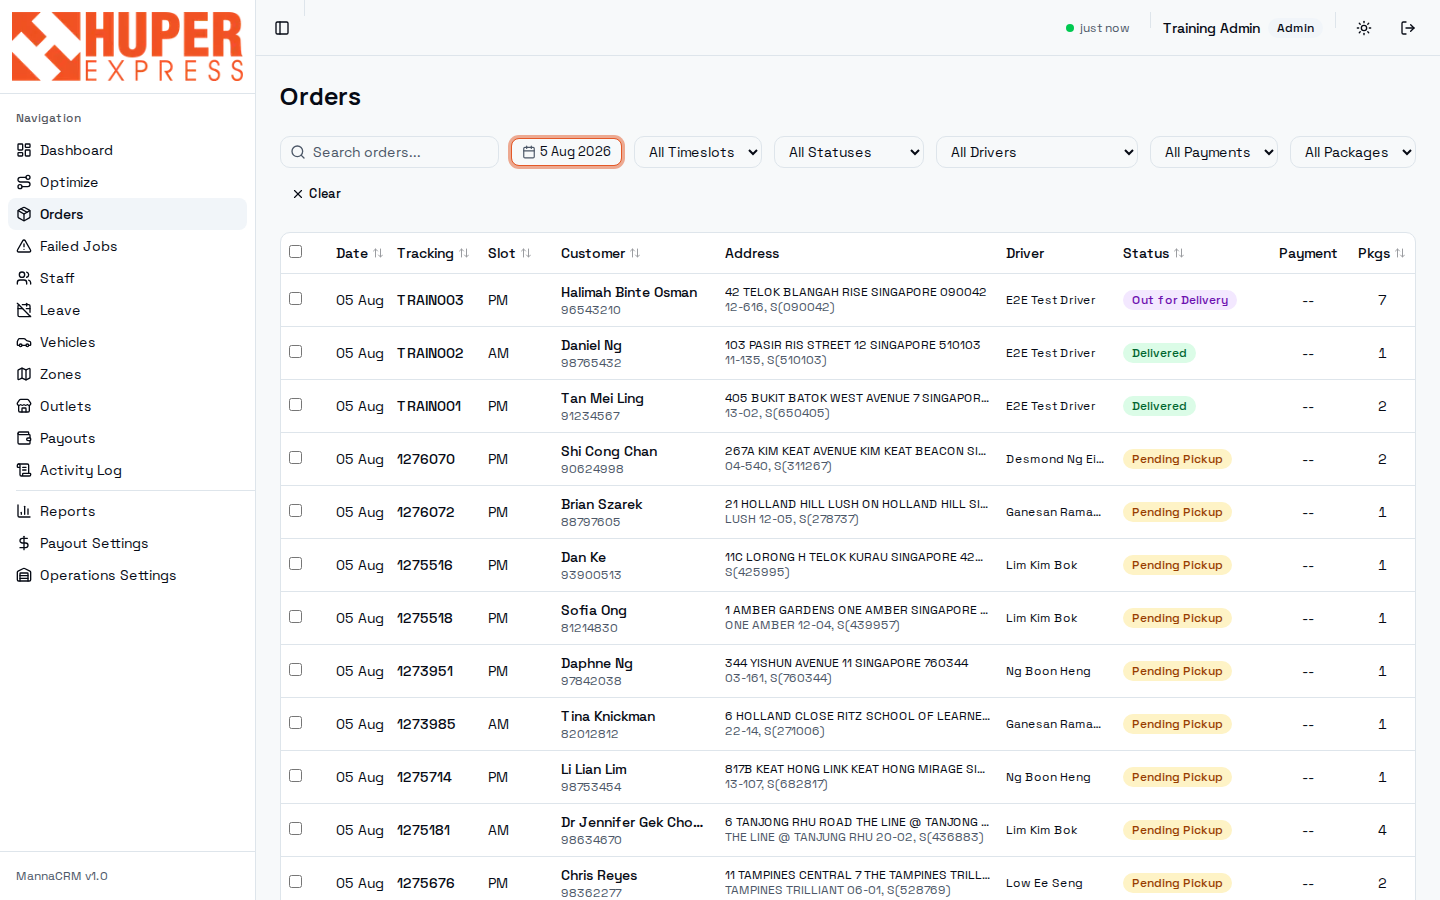
- Search
Matches tracking number, customer name and phone. Paste whatever the caller gives you.
- Date filter
Defaults to today + tomorrow (tomorrow's orders arrive through the evening syncs). Quick presets (Today, Yesterday, This Week) live in the same picker.
- Filter row
Time slot, status, driver, payment type and package count. Combine them: Failed + yesterday + driver reconstructs one driver's bad afternoon in two clicks.
- Driver column
Who carries each order right now: filled by zone auto-assign, blank (“Unassigned”) when no zone matched.
- Status badges
The live lifecycle: amber Pending Pickup (packages not fully scanned), purple Out for Delivery, green Delivered. Full table below.
- Bulk select
Tick rows to act on many orders at once (e.g. reassigning a batch after a van breakdown).
- Pkgs
Physical packets in the order. 7+ packet orders earn the driver a per-packet add-on, so this column also matters for payouts.
| Status | Meaning | Moved by |
|---|---|---|
| Unassigned | No driver yet: no zone matched the postal prefix, or the zone has no active driver. | Auto-assign tick, or you |
| Pending Sync | Assigned in the CRM but the driver's app hasn't pulled it yet (driver hasn't started shift / synced). | Driver app sync |
| Pending Pickup | On the driver's list; packages not yet all scanned at the warehouse. | Driver scanning |
| Out for Delivery | All packages scanned and the driver has left the warehouse geofence. | Geofence / driver |
| Delivered | Completed with proof of delivery. The only status that earns payout. | Driver |
| Failed | Not delivered, with a reason code. Close-day also fails anything left over at midnight. | Driver / close-day |
In the daily flow
Customer calls in → search their number here first; the order drawer answers “where is it, who has it, was it paid” without leaving the page.
Order drawer: one delivery, fully told#
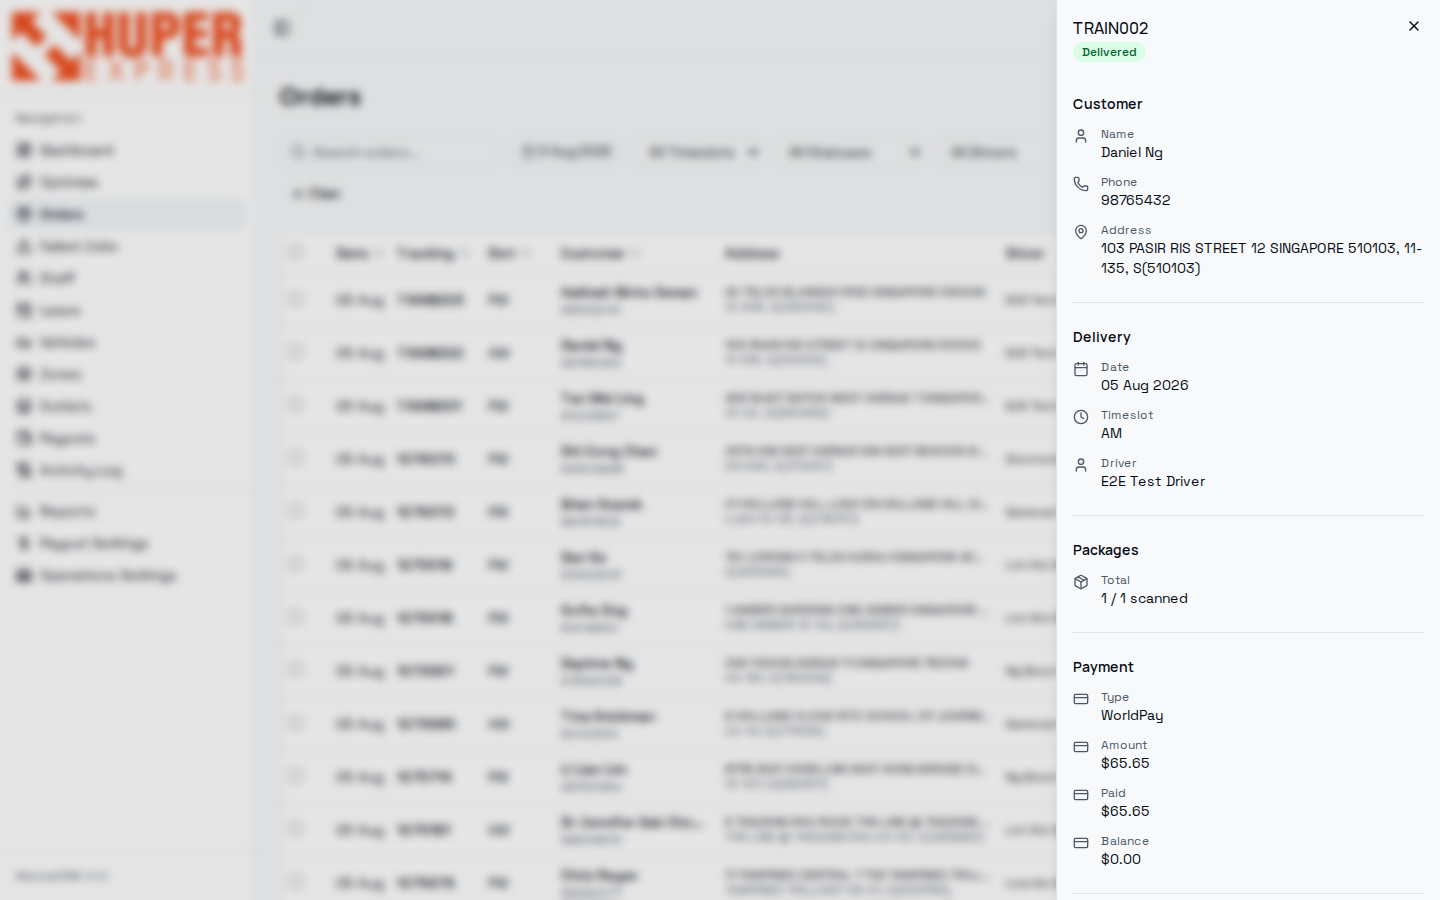
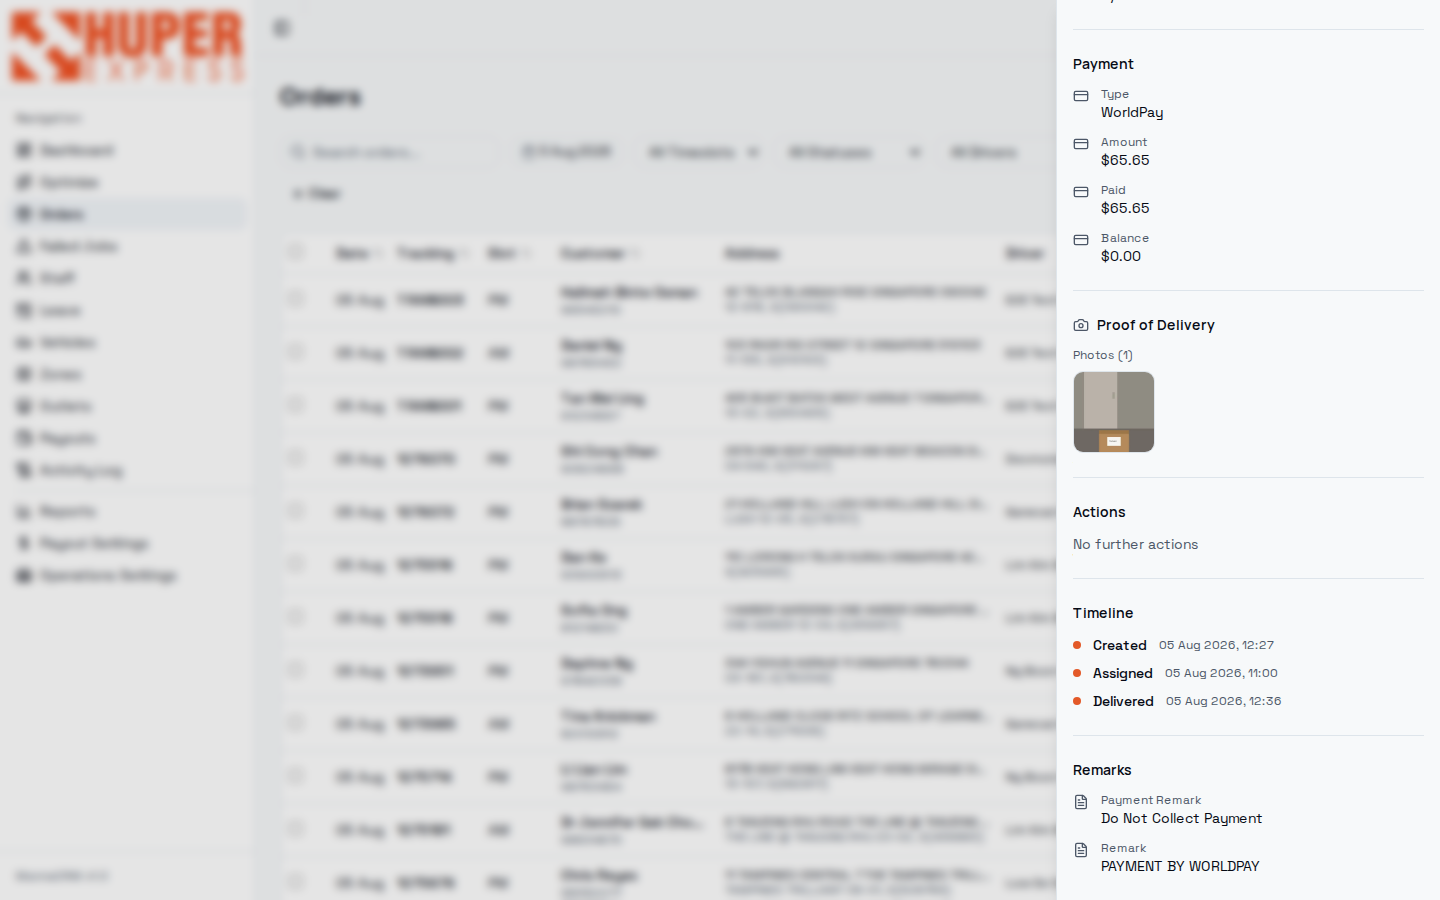
Clicking a row slides out the drawer. This example is a delivered order minutes after the driver completed it: status is green, the proof-of-delivery photo is in, and the timeline shows the whole journey. Top half: who, where, what. Bottom half: money, proof and the audit trail.
- Tracking + status header
The POS tracking number and lifecycle badge, always visible while you scroll the drawer.
- Customer block
Name, phone, full address with unit and postal code. Call the customer from here when a driver reports a problem.
- Delivery block
Date, AM/PM slot, and the carrying driver. If the POS moves the date, the order re-syncs; the CRM never edits the POS's delivery date itself.
- Packages
“1 / 1 scanned”: every barcode was scanned at pickup. Short scans show as 0/2-style fractions and block a clean run start.
- Payment
Type (CASH / WorldPay / …), amount, paid and balance. This WorldPay order is prepaid: balance $0.00, and the payment remark below says “Do Not Collect Payment”. Drivers see the same instruction.
- Proof of Delivery
The photo the driver captured at the door, seconds after confirming the job. Click to view full size: this is what settles “it never arrived” disputes.
- Timeline
Timestamped lifecycle: Created 12:27 → Assigned → Delivered 12:36. Your first stop for “what actually happened”.
- Actions
Status-appropriate actions. A delivered order shows “No further actions”; earlier stages offer the pushes you need.
- Remarks
Special instructions, CS remarks and payment remarks, synced from the POS and shown verbatim to the driver.
Watch out
POD photos are presigned links that expire. Always open them from the drawer fresh rather than saving URLs.
Route Optimizer: a better plan, on request#
Zone assignment is fair and predictable, but some days are lopsided. The optimizer takes the chosen date's orders and computes driving-time-efficient routes across the drivers you tick, using our own routing engine. It changes nothing until you explicitly apply the result.
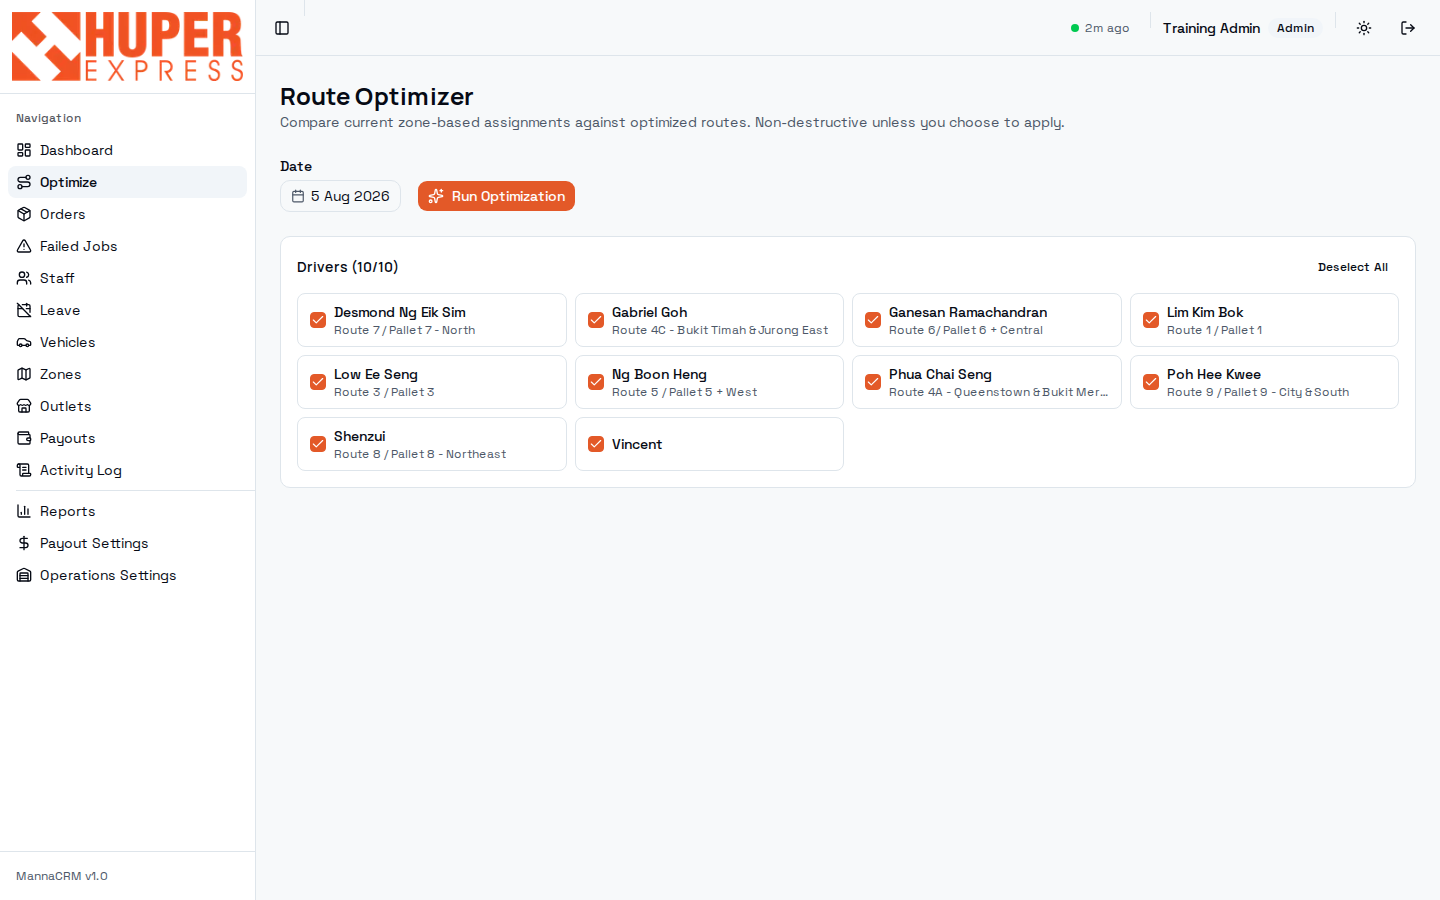
- Non-destructive promise
Running an optimization only produces a comparison. Today's live assignments stay untouched until you apply.
- Date
Optimize today mid-morning, or tomorrow in the evening once most of its orders have synced in.
- Run Optimization
Sends the day's stops to the OSRM routing engine (real Singapore road network, not straight lines) and returns proposed routes with distance/time deltas.
- Driver pool
Tick who is actually available. The zone label under each name shows their normal patch. Untick anyone on leave; the optimizer only spreads work across checked drivers.
In the daily flow
Best used when Driver Load shows one red bar and several green ones: let the engine propose the rebalance instead of dragging stops one by one.
Watch out
Apply replaces assignments for that date. Warn drivers whose routes change mid-shift; their app re-syncs the new list on the next pull.
Failed Jobs: the exceptions queue#
Every failed delivery for the chosen date with its reason, in one queue. This capture shows a real day: 270 orders auto-closed at midnight because they were never completed in the driver app. Each row carries the tracking number, customer, slot, postal, the reason, and the driver who held it.
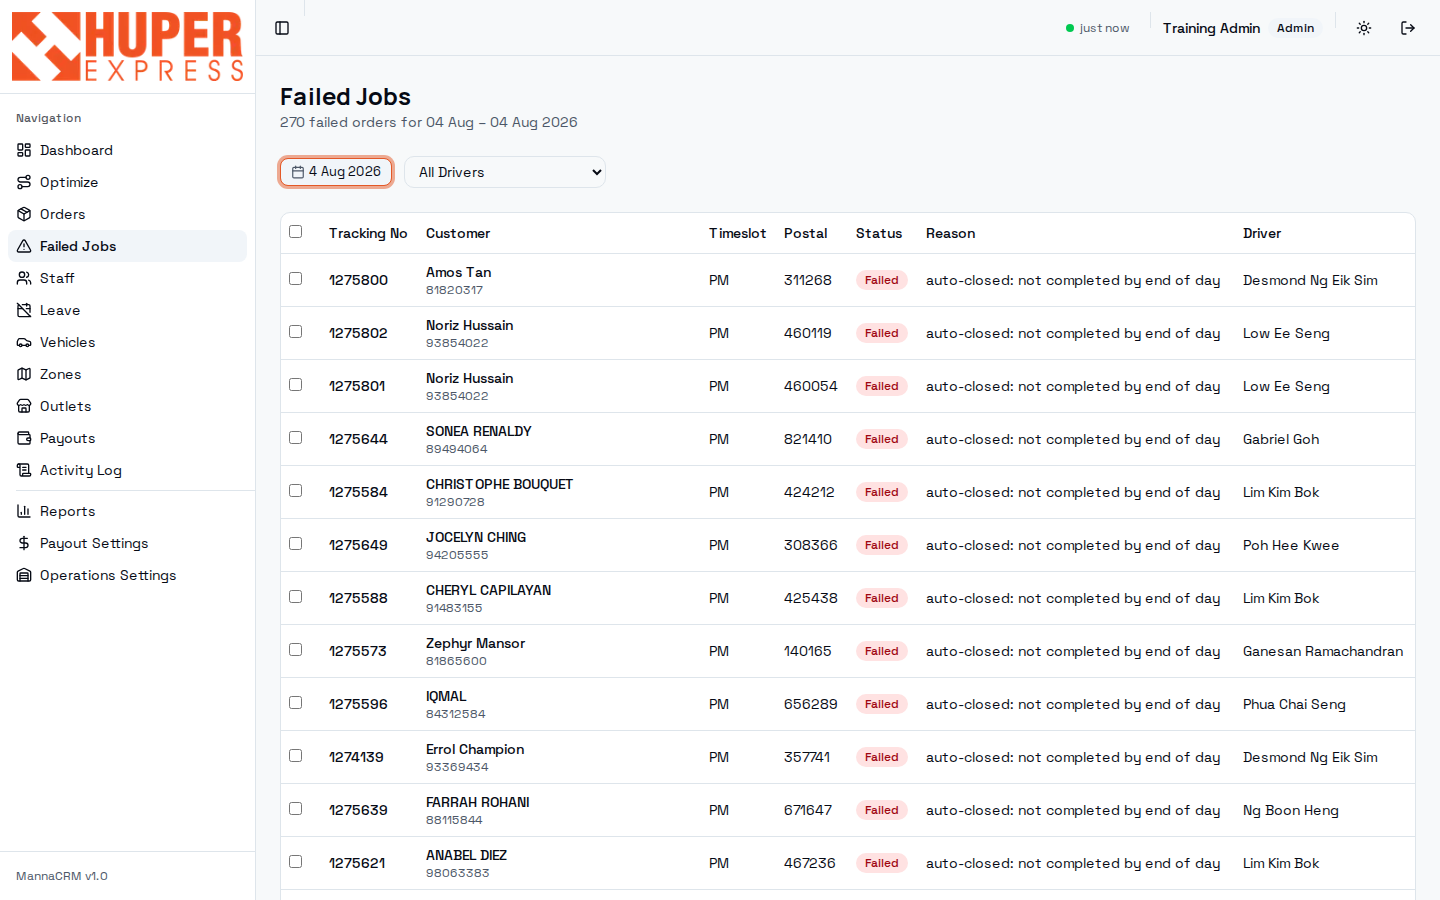
- Date picker
Defaults to today; quick presets (Yesterday, Last 7 Days…) sit inside. Review the previous date first thing each morning: that's where close-day left its sweep.
- Driver filter
One driver failing many stops in a row usually means an area problem (locked estate, breakdown), not many individual customer problems.
- The queue
Tracking, customer, slot and postal: everything you need to call the customer and rebook without opening each order.
- Reason
Driver-reported reasons (Not Home, Wrong Address, Refused, Access Denied) come from the app's failure flow. “auto-closed: not completed by end of day” means nobody resolved it and the close-day job failed it at midnight.
- Driver
Who carried the order. Pair with the Activity Log timeline before promising the customer a story.
In the daily flow
Failures become tomorrow's redeliveries: confirm the new delivery date with the customer, and the order re-enters tomorrow's assignment run.
Watch out
A wall of “auto-closed” reasons means the day ended without the driver app closing jobs: an operations-process gap, not 270 individual customer issues.
Staff: people, roles and employment types#
Single directory for everyone in the operation: admins, supervisors and drivers. Two fields here quietly drive the rest of the system: role (what they can do) and employment type (what they're paid per delivery).
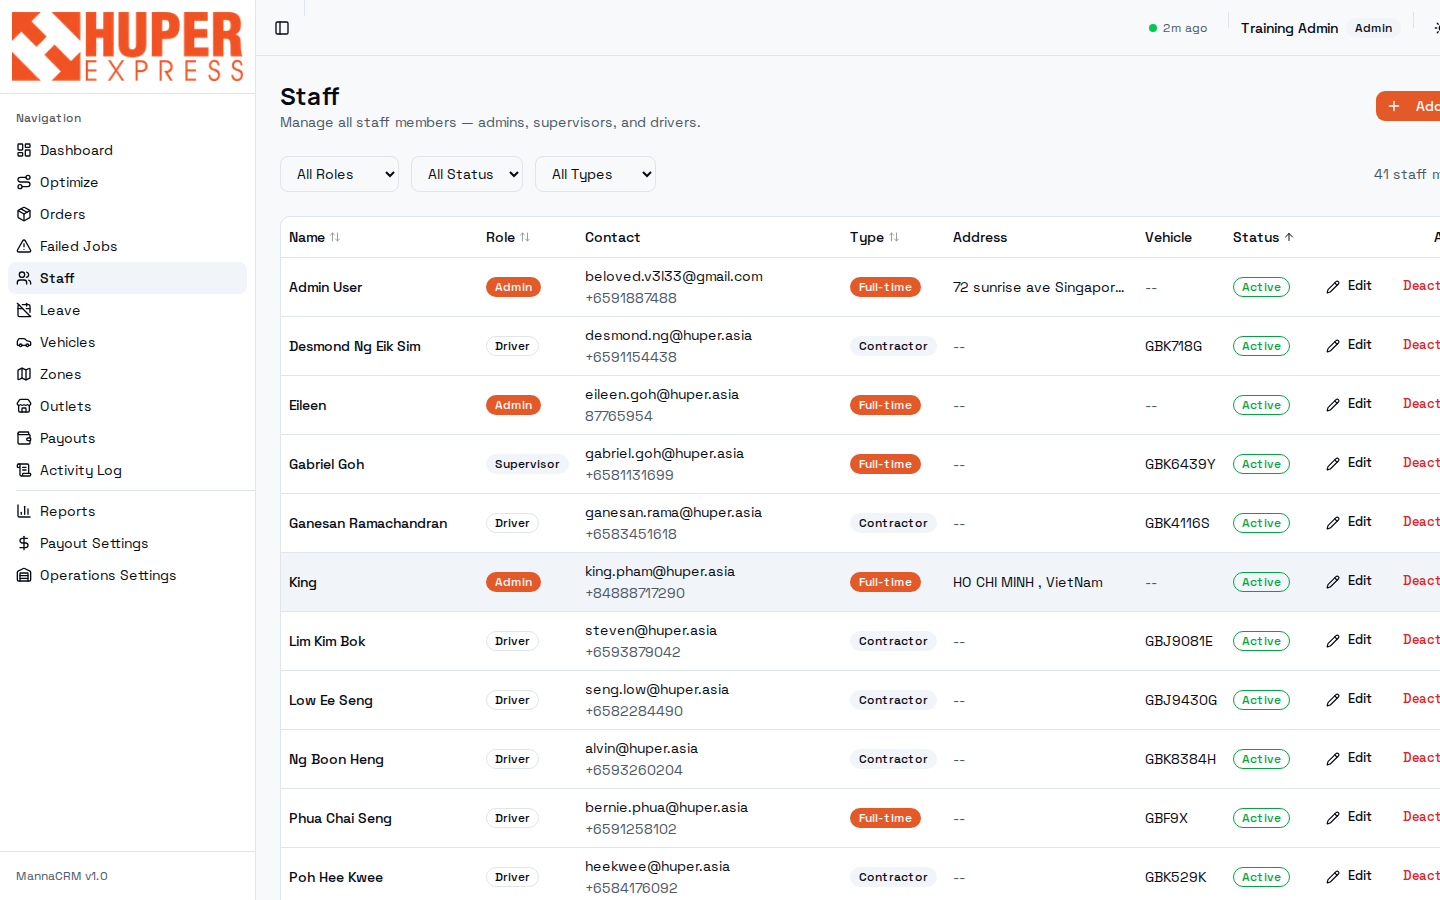
- Filters
Role, active status, employment type. “41 staff members” counts everyone ever added; filter Active to see the live crew.
- Role badge
Admin = full access including settings and payouts. Supervisor = daily ops. Driver = no CRM access, only the driver app. Changing role here changes what their login can reach immediately.
- Employment type
Full-time or Contractor. This selects the payout rate: contractors earn $5.00 per delivery, full-timers $2.00 (on top of salary). Set it wrong and month-end pay is wrong.
- Vehicle
The van currently assigned (see Vehicles). The plate follows the driver into route printouts.
- Edit / Deactivate
Deactivate rather than delete when someone leaves: history, payouts and reports keep referencing them correctly. Deactivated drivers stop receiving zone assignments on the next tick.
Watch out
Creating a driver here creates their app login. Phone number matters: it's the WhatsApp target for job notifications and the OTP login for the driver app.
Leave: planned absence, automatic cover#
A calendar of driver leave and public holidays. Approved leave is not just a record: on the next assignment tick the leave-taker's zones fall through to the backup prefixes configured in Zones, so their orders quietly route to the covering driver.
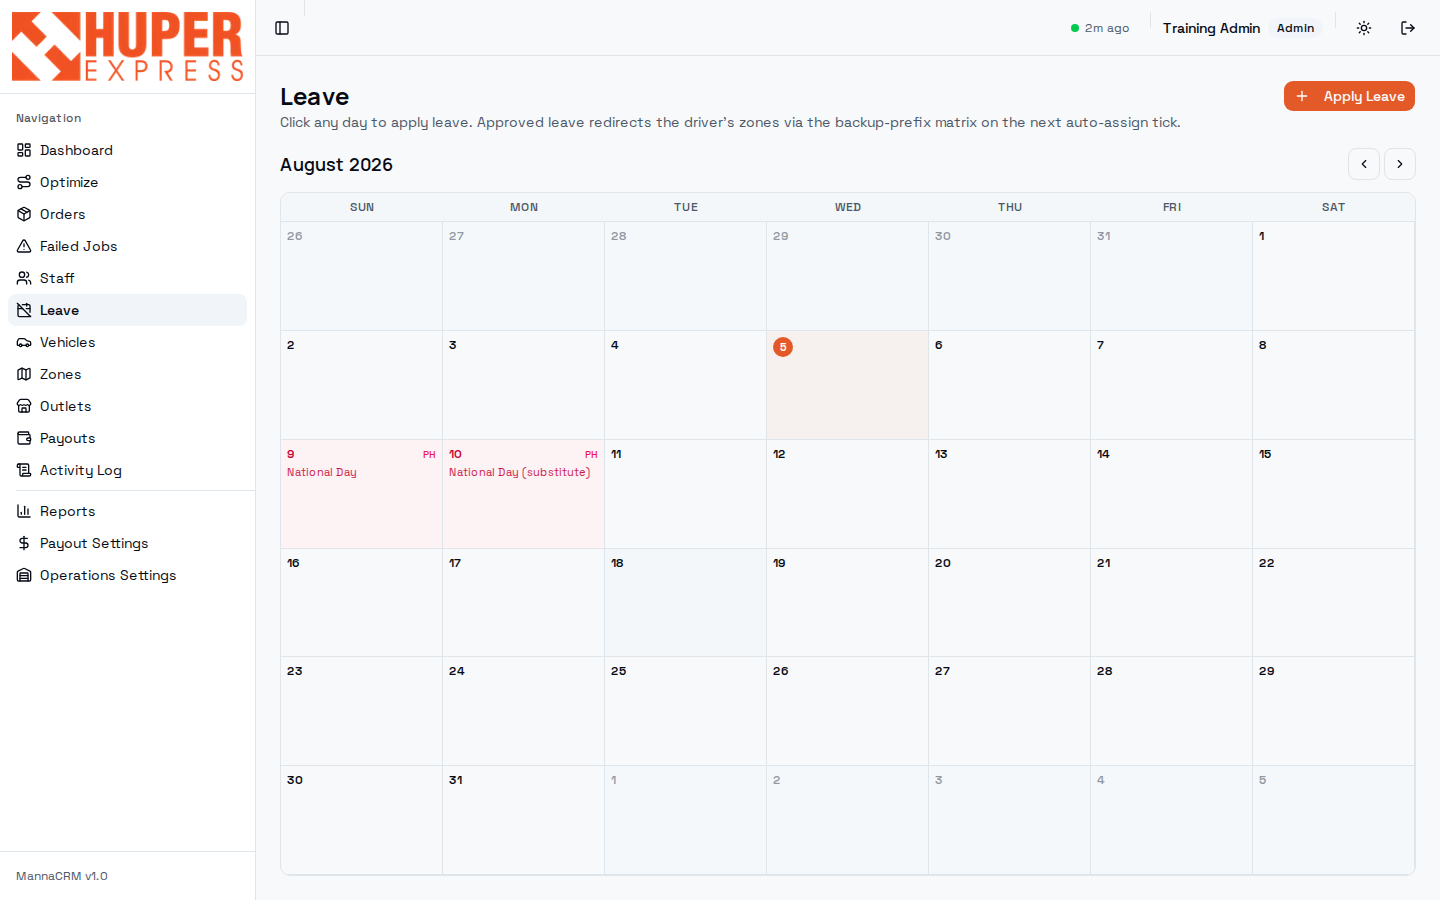
- How cover works
Approved leave redirects the driver's zones via the backup-prefix matrix on the next auto-assign tick. No manual re-zoning needed for planned absence.
- Apply Leave
Book leave for any driver: pick person, date(s) and full-day or AM/PM half. Half-day leave only redirects that slot's orders.
- Click any day
Clicking a calendar cell opens the same apply form pre-filled with that date: fastest path when a driver calls in.
- Public holidays
PH days (National Day and its substitute here) are marked automatically. Expect reduced schedules around them.
In the daily flow
Sick call at 05:30: book today as leave, run Sync & Assign, check Driver Load. The backup driver's bar absorbs the zone; rebalance if it went red.
Watch out
Leave cover depends on backup prefixes existing in Zones. A zone with no backup driver goes to Unassigned instead; the dashboard badge will tell you.
Vehicles: the fleet register#
Every van the operation runs, who drives it, and the two dates Singapore never lets you forget: COE expiry and next service.
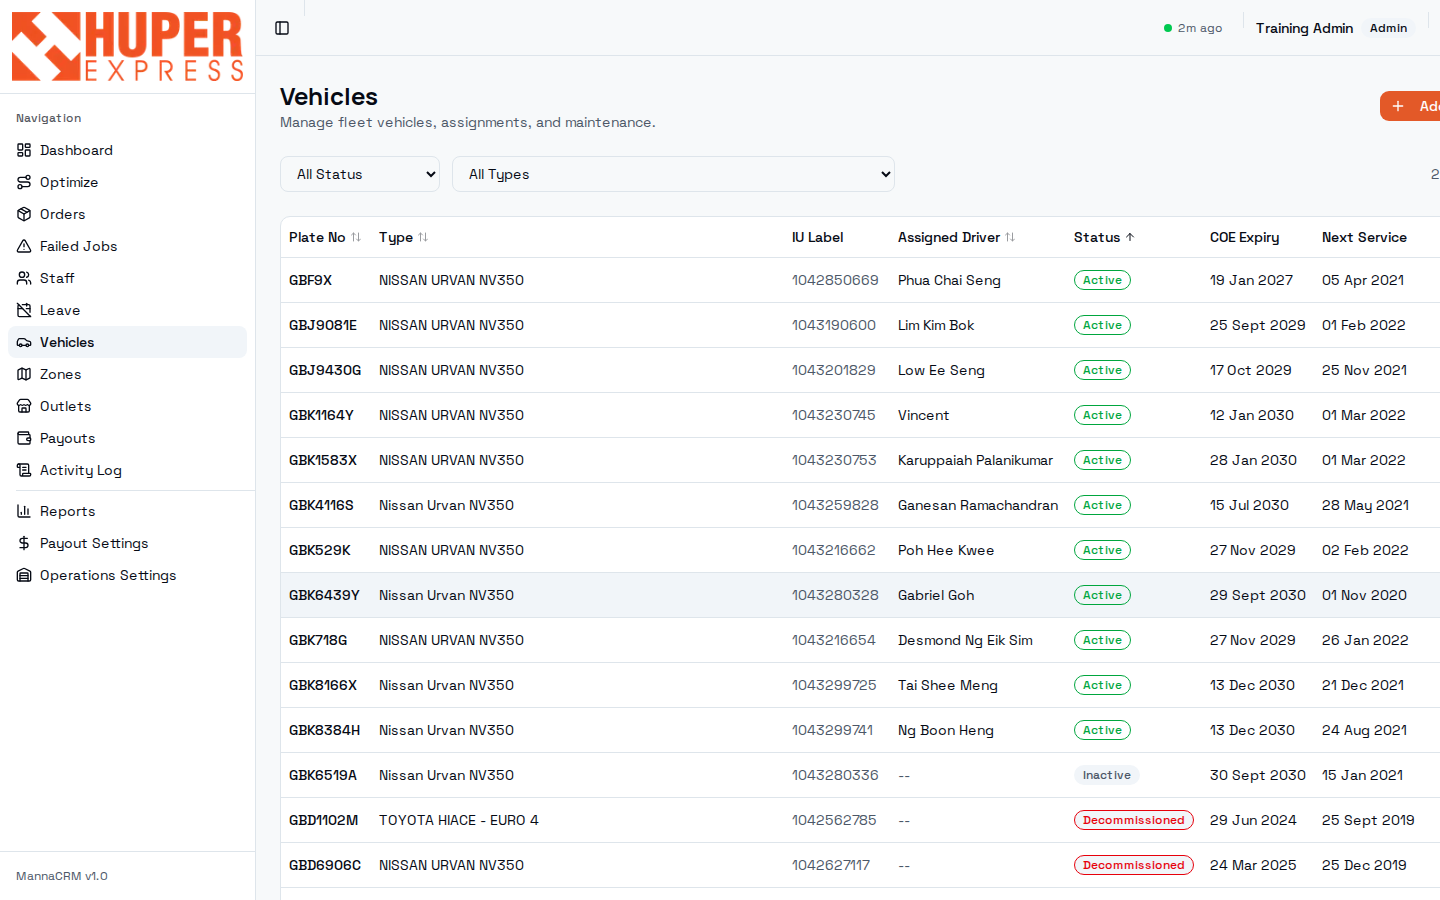
- Filters
Status (Active / Inactive / Decommissioned) and vehicle type.
- IU label
The in-vehicle unit number: what ERP and toll/parking records key on.
- Assigned driver
Mirrors the Staff screen's vehicle column; assignment history is kept so past deliveries stay attributed to the right van.
- Status
Decommissioned vans stay for history but can't be assigned. Inactive = temporarily off the road (repair, inspection).
- COE expiry & next service
Sort by these monthly. A van whose COE lapses is an instant capacity cut of ~40 stops per slot.
Zones: the assignment brain#
This table is the whole auto-assignment algorithm. An order's 2-digit postal prefix is looked up here; the matching zone names a primary driver (and a backup matrix for leave days). Edit this table and you have re-programmed tomorrow morning.
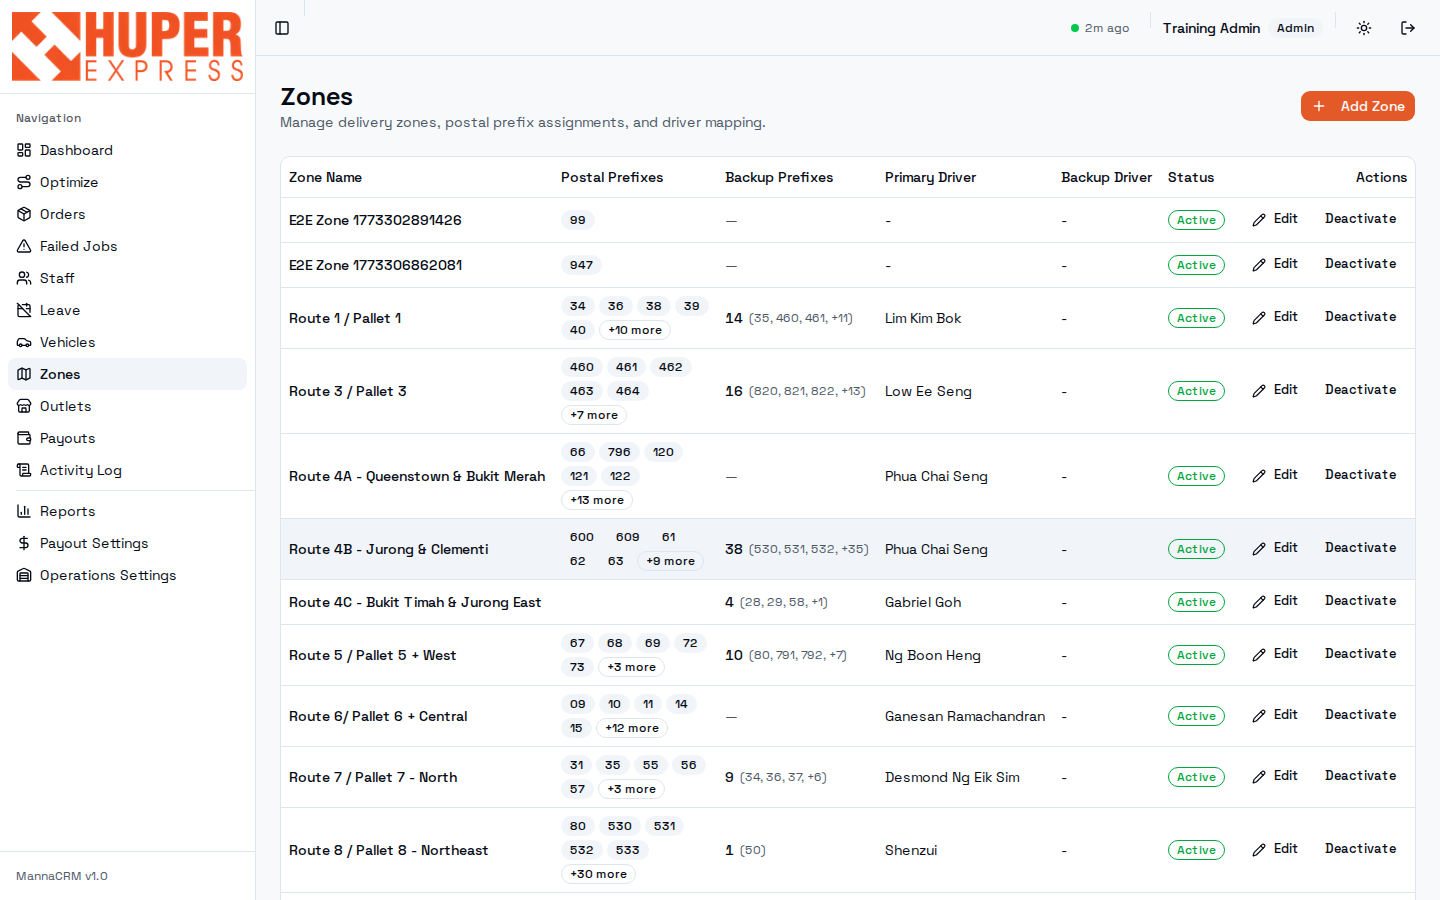
- Zone = route = pallet
Zones are named after the physical routes/pallets in the warehouse (Route 1 / Pallet 1 …), so the map colours, the printed sheets and the warehouse floor all speak the same language.
- Postal prefixes
The first two digits of the six-digit postal code. A prefix should live in exactly one active zone; overlaps make assignment order-dependent.
- Backup prefixes
Where this zone's orders go when its driver is on leave. This is the matrix the Leave screen relies on.
- Primary driver
The default assignee for every order whose prefix lands in this zone. Changing the driver re-points future syncs only; existing assignments stay.
- Edit / Deactivate
Deactivating a zone sends its prefixes to Unassigned. Do it deliberately (e.g. splitting a zone) and immediately re-home the prefixes.
- Add Zone
New estates and reshuffles: create the zone, list its prefixes, name the driver, then Sync & Assign to apply to today's book.
In the daily flow
When the dashboard shows Unassigned, the fix is almost always here: a prefix nobody owns. Known historical gaps: prefixes 18, 19 and 37.
Watch out
The zone engine only sees the postal prefix. A mis-typed postal code in the POS lands the order in the wrong zone. Fix the address at source, then re-sync.
Outlet Delivery Schedules: the weekly roster#
Alongside home deliveries, drivers restock retail outlets. This grid is the weekly roster: rows are outlets, columns are days, a coloured pill means that driver does that outlet that day. The driver app turns each pill into an outlet run with its own load/deliver flow.
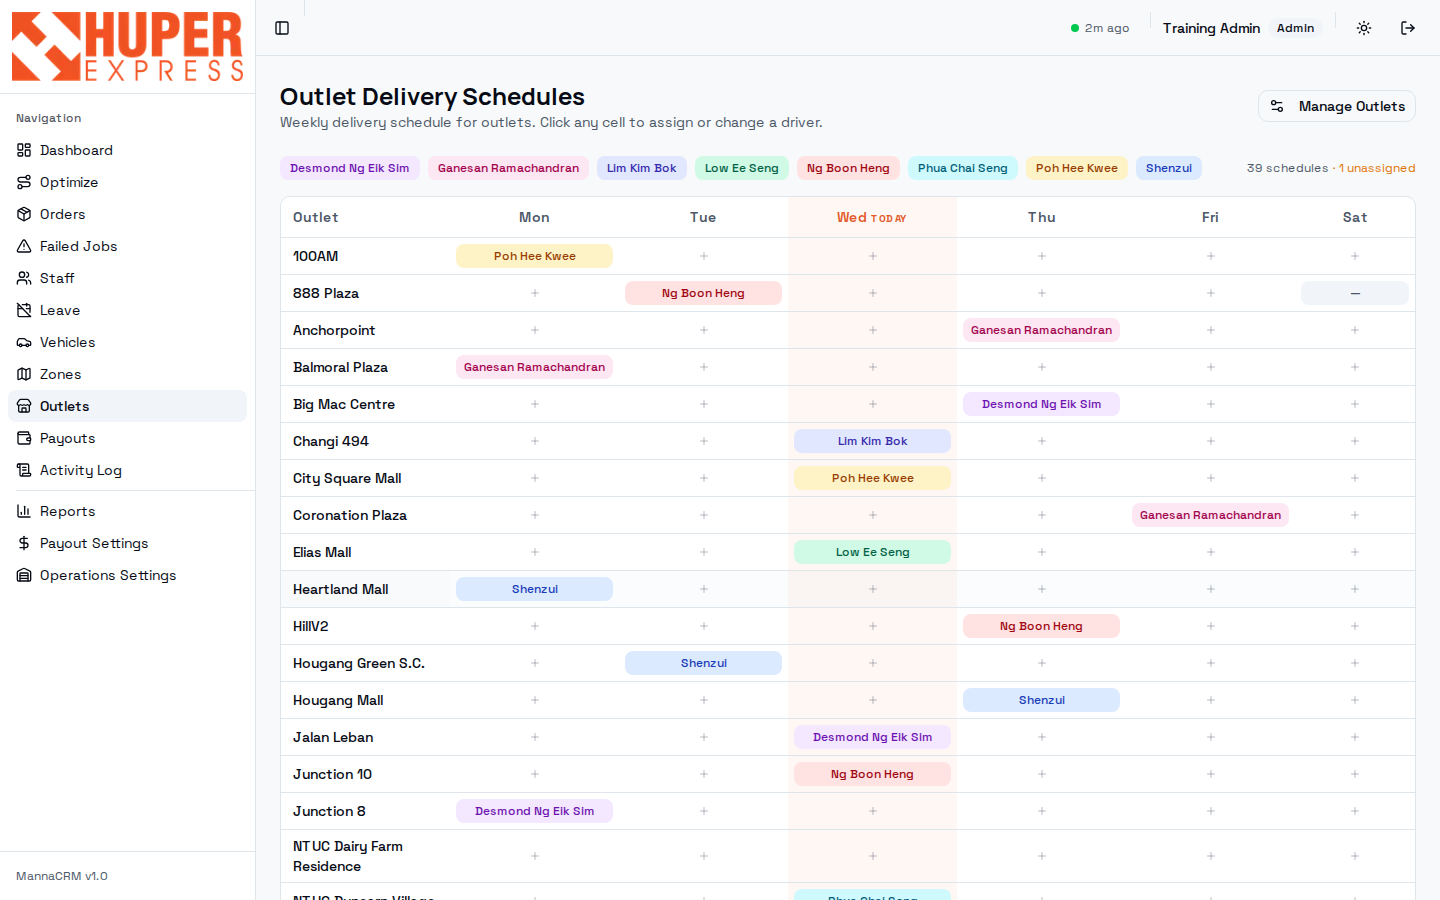
- Driver legend
Each driver has a colour, the same palette as the pills in the grid, so you can eyeball one driver's outlet week.
- Today column
Highlighted. These runs surface in the OUTLET counters on the dashboard and in each driver's app this morning.
- Click any cell
Click an empty “+” to assign a driver to that outlet/day; click a pill to change or clear it. Changes take effect from the next day's run generation.
- Unassigned counter
“39 schedules · 1 unassigned”: an outlet/day with no driver. Clear it the same way you clear unassigned orders.
- Manage Outlets
The outlet master list: names, addresses, active status. Add new outlets there before they can be rostered here.
In the daily flow
Outlet runs are paid separately from home deliveries (see Payout Settings → Outlets), so keeping the roster accurate keeps outlet pay accurate.
Payouts: month-end settlement#
Where a month of delivered orders becomes driver pay. Payout rows are created automatically the moment a delivery completes; this screen gathers them into a monthly period for review and approval. August is empty at capture time: a fresh month.
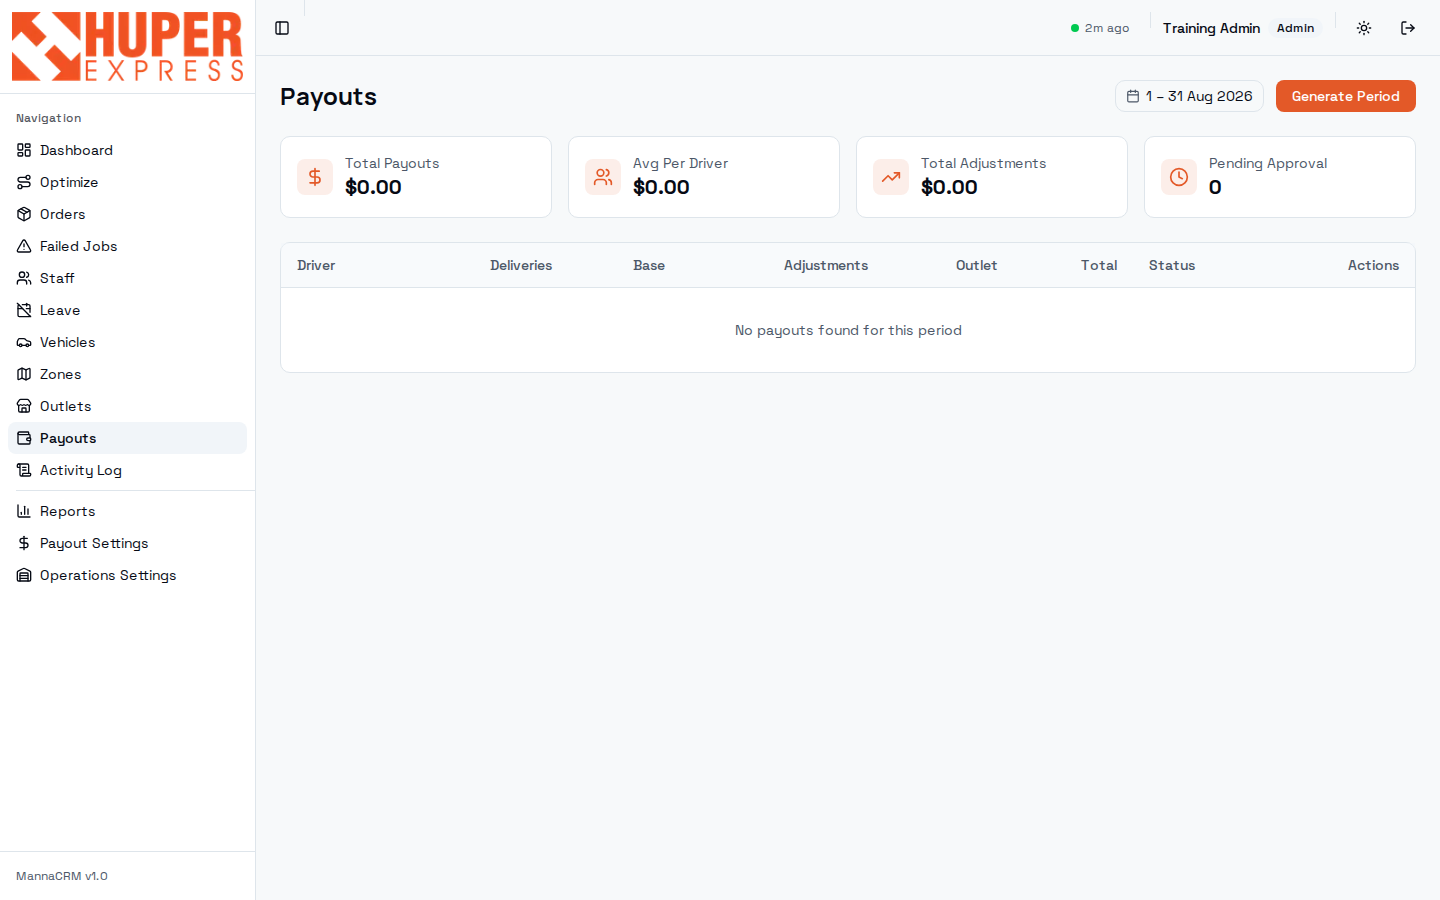
- Period picker
Calendar-month periods. Look back at any month's approved run.
- Generate Period
Computes payouts for every driver from that month's delivered orders: base rate × deliveries + surcharges + package add-ons ± adjustments + outlet runs. Safe to regenerate before approval.
- Summary cards
Total payouts, average per driver, manual adjustments and how many rows still await approval: your month-end checklist in four numbers.
- Per-driver rows
Deliveries count, base pay, adjustments, outlet pay, total, and an approval action per driver. Approval locks the row for payroll.
In the daily flow
Month-end: wait for the last close-day of the month → Generate Period → spot-check two or three drivers against Reports → Payout → approve.
Watch out
Only delivered orders count. Failed and pending never pay. If a driver disputes, the Activity Log plus POD photos settle it in minutes.
Payout Settings: the pay formula#
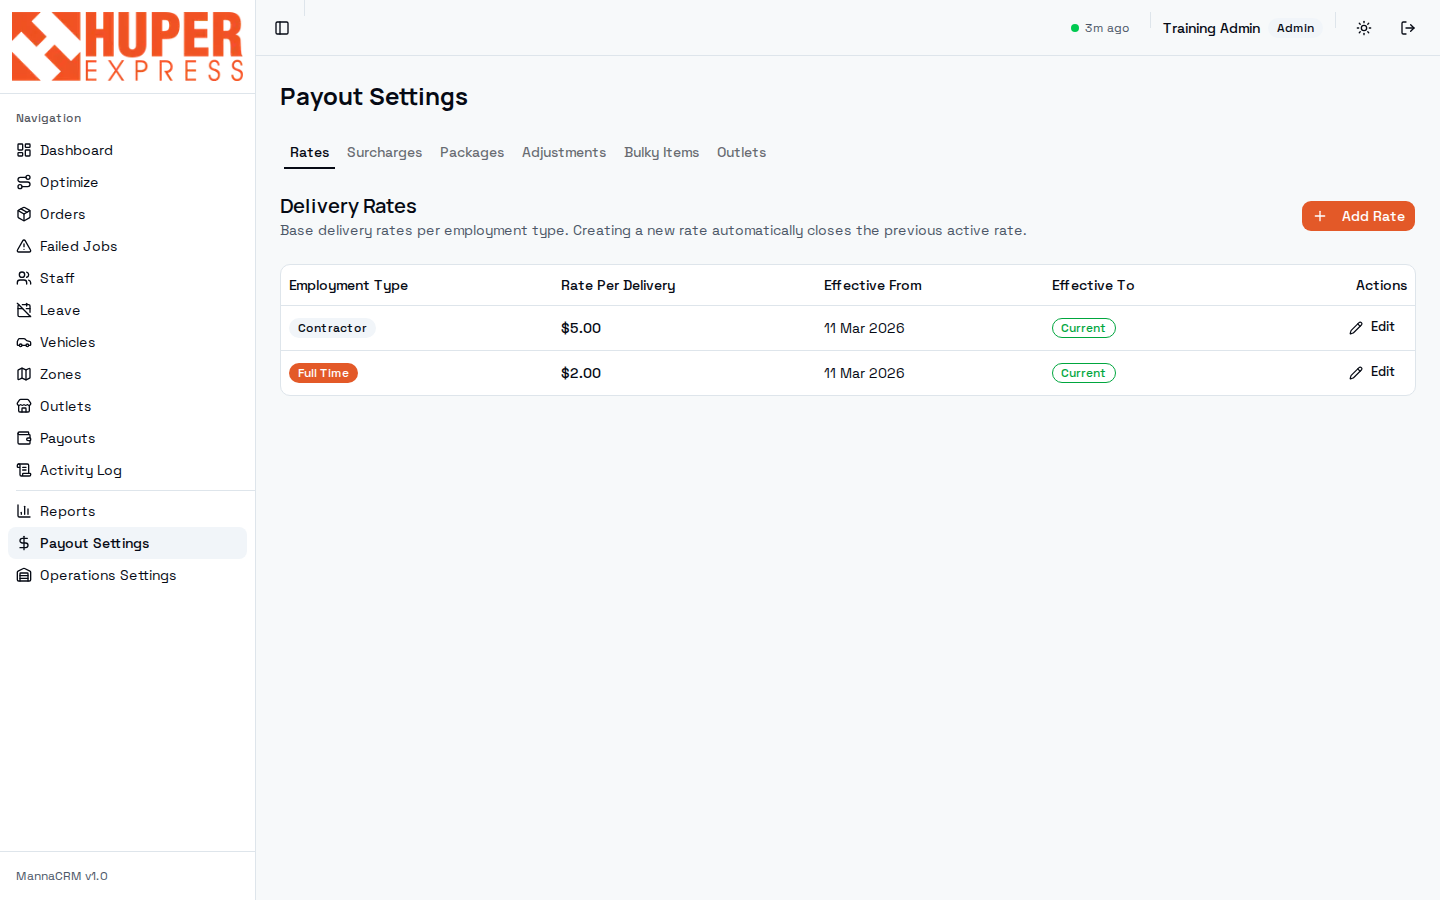
The rules the Generate step applies. Each tab is one term of the formula: base rate per employment type, postal surcharges, package-count add-ons, one-off adjustments, bulky item rates and outlet run rates.
- Tabs
Rates · Surcharges · Packages · Adjustments · Bulky Items · Outlets. Work left to right when onboarding a new pay policy.
- Add Rate = rate history
Creating a new rate auto-closes the previous one with an effective-date range. Past months keep paying at the rate that was current then. Never edit an old rate to “fix” history.
- Current base rates
Contractor $5.00 per delivery; Full-time $2.00 (full-timers also draw salary). Set per staff member via employment type on the Staff screen.
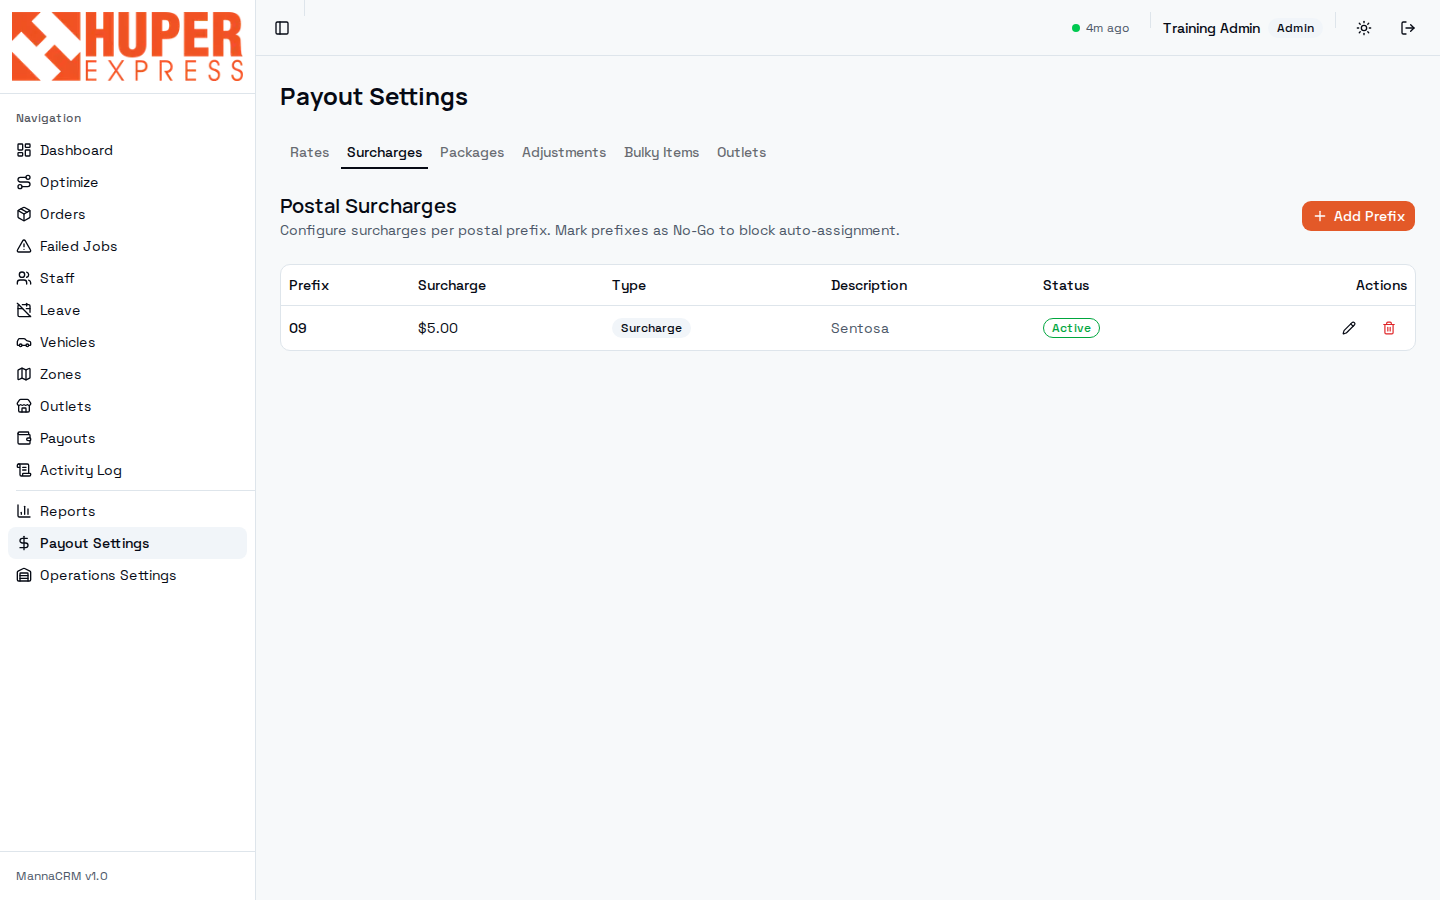
- No-Go prefixes
Surcharge rows can also be marked No-Go, which blocks auto-assignment into a prefix entirely: the lever for areas we don't serve.
- Sentosa surcharge
Prefix 09 pays the driver an extra $5.00 per delivery. Package add-on policy (Packages tab): orders with 7+ packets pay a flat add-on, $5 for contractors, $1 for full-time.
Watch out
Rate changes apply from their effective date forward. Change rates before generating the period, not after approving it.
Reports: the numbers that leave the building#
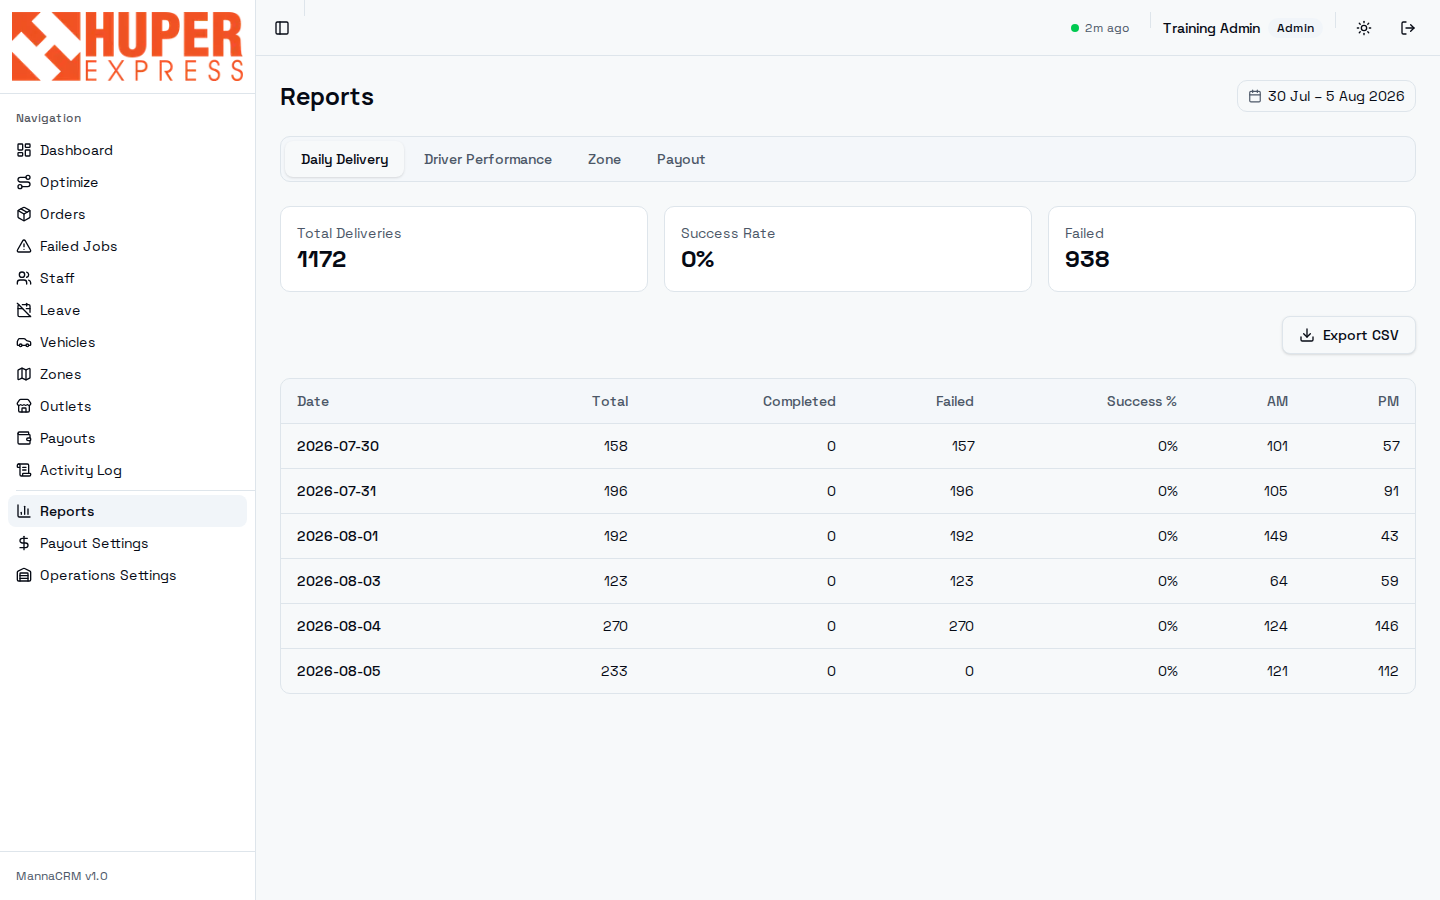
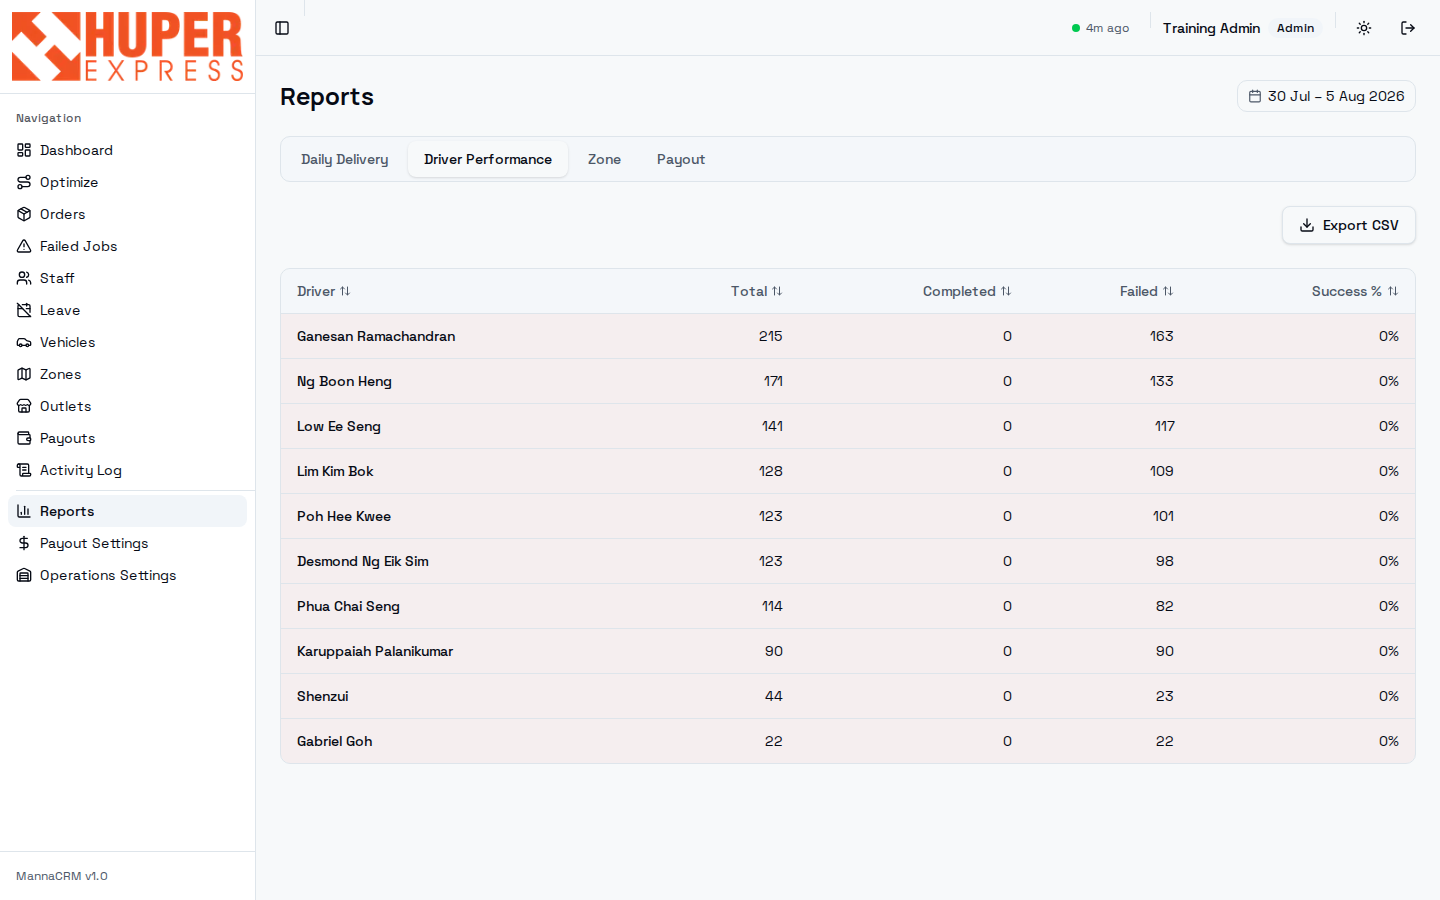
Four rollups over any date range, each exportable to CSV. Daily Delivery is the day-end story; Driver Performance ranks the crew; Zone shows where the load and failures live; Payout mirrors the payouts screen for finance.
- Report tabs
Switch rollup without losing your date range. Deep-linkable (?tab=zone) for bookmarks.
- Date range
Defaults to the trailing week. Month-to-date is the natural range for payout cross-checks.
- KPI cards
Total, success rate, failed for the range.
- Export CSV
Exactly the table below, as a file: the handoff format for management and finance.
- AM / PM split & per-driver rows
Daily rows split by slot to show where a bad day went wrong; the Driver tab turns the same range into totals, completed, failed and success % per driver.
Activity Log: the audit trail#
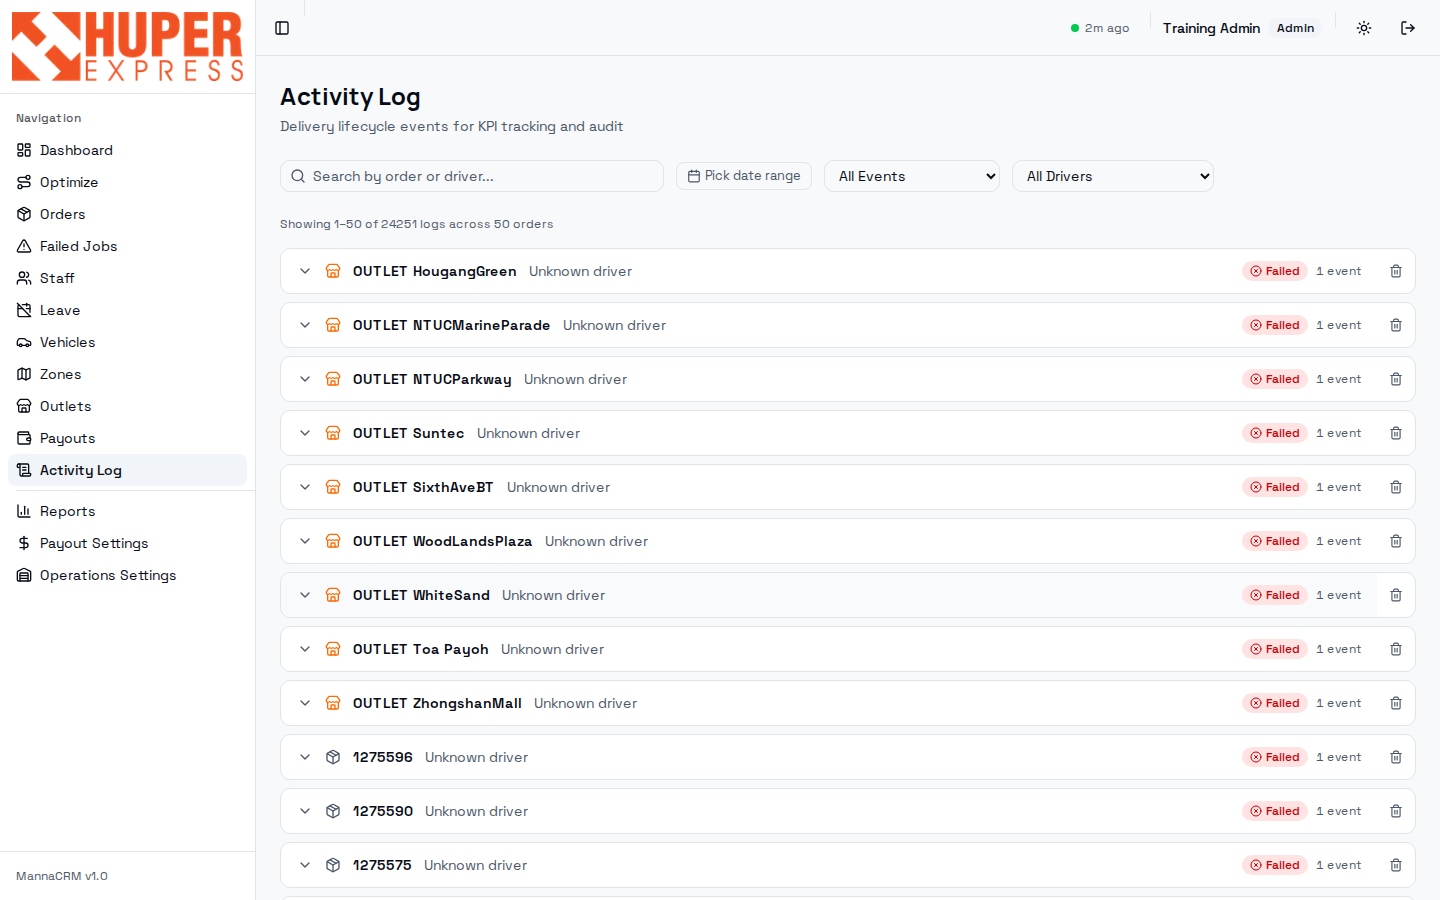
Every lifecycle event the system or a person produces, grouped per order: assignments, scans, status changes, failures, deletions. When anyone asks “who did that and when”, the answer is here.
- Search
By order tracking number or driver name: the quickest route to one order's full history.
- Filters
Date range, event type, driver. “Failed events + yesterday” reconstructs the close-day sweep.
- Volume line
“Showing 1–50 of 24,251 logs across 50 orders”: the log is complete history; always filter before scrolling.
- Grouped rows
Each order expands to its timestamped events. Outlet runs log here too (OUTLET prefix). “Unknown driver” rows are system events like close-day failing an unassigned order.
Watch out
The delete (bin) icon removes a log group: admin only, and rarely the right answer. Prefer leaving history intact; reports already exclude voided orders.
Operations Settings: two numbers that gate the day#
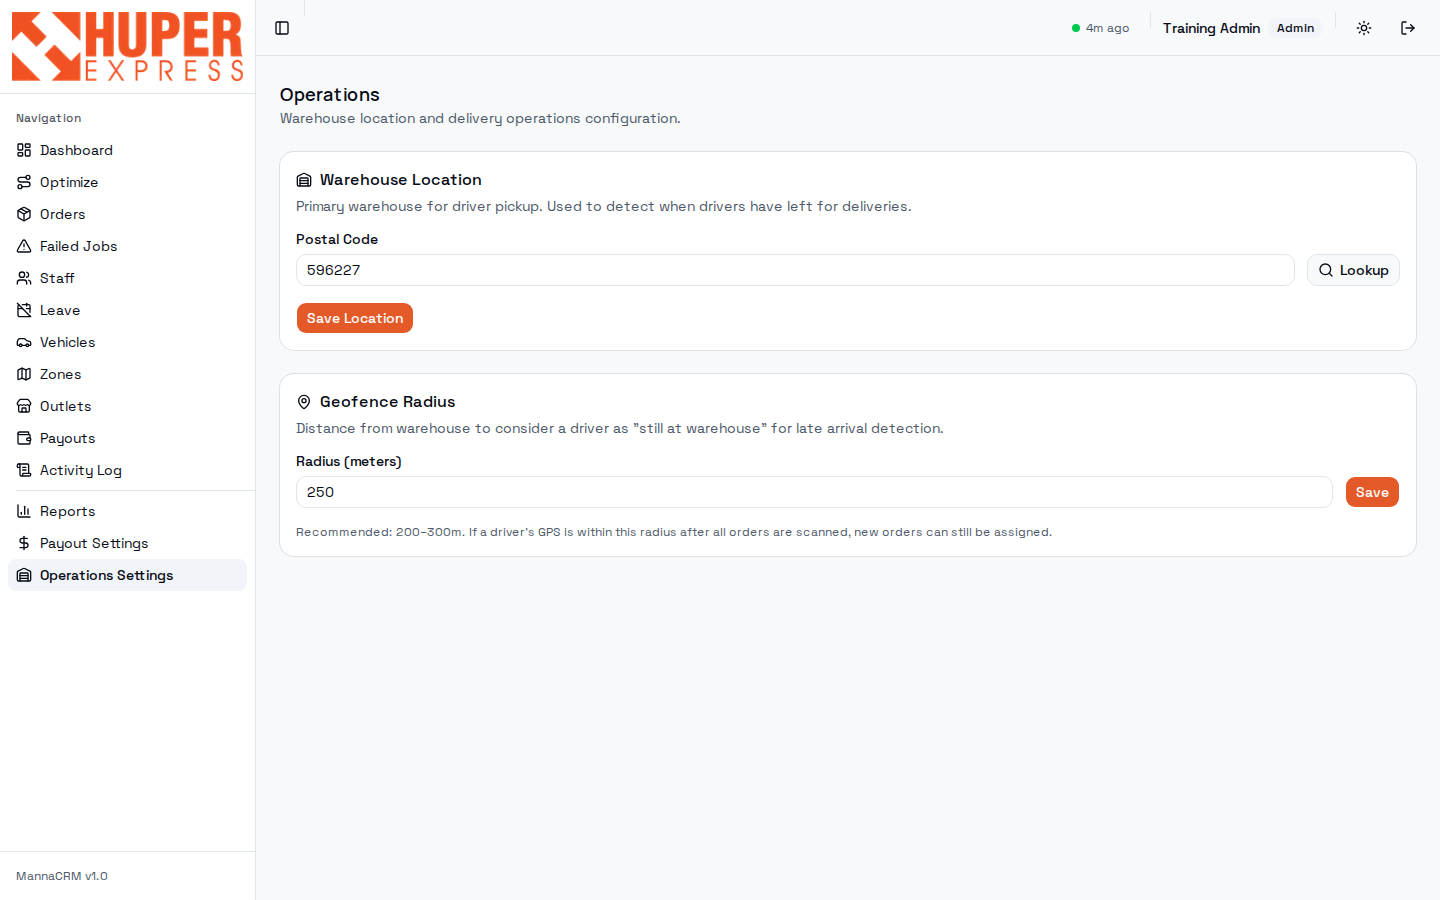
Deliberately small: where the warehouse is, and how far “at the warehouse” stretches. Both feed the geofence logic that turns driver GPS into operational truth.
- Warehouse location
Postal 596227 (Toh Tuck Link), resolved via Lookup against the national postal database. Departure detection, “start early” logic and late-arrival alerts all measure from this point.
- Geofence radius
250 m (recommended 200–300). Inside it a driver still counts as “at warehouse”, so late-arrival detection holds off and freshly synced orders can still join their run. Too small = false departures in the car park; too large = departures detected late.
Watch out
Changing warehouse postal mid-day confuses departure detection for drivers already out. Change it after close-day, not during operations.
The supervisor's day: a checklist#
Everything above, compressed into the rhythm of one operating day.
| When | Do | Screen |
|---|---|---|
| 05:45 | Confirm overnight orders synced; counters look sane; green freshness dot. | Dashboard |
| 06:00 | Clear Unassigned (fix zones / assign manually), then Sync & Assign. | Dashboard · Zones |
| 06:15 | Check Driver Load; rebalance red bars (Reassign Driver or Optimize). | Dashboard · Optimize |
| 06:30 | Print All Routes; confirm outlet runs have drivers. | Dashboard · Outlets |
| Morning | Watch scans progress; chase drivers still Pending Pickup after departure time. | Orders |
| Midday | Review AM failures while PM loads; call customers where needed. Live Tracking for stuck vans. | Failed Jobs · Order drawer |
| Evening | Completed ≈ Total? Work the remaining exceptions before close-day fails them for you. | Dashboard · Failed Jobs |
| Next morning | Review what close-day auto-closed at midnight; arrange redeliveries. | Failed Jobs (yesterday) |
| Month end | Generate payout period, cross-check with Reports → Payout, approve. | Payouts · Reports |