

Driver App
Driver app guide
One shift, start to finish: every screen of the driver app annotated with live data.
Your app for the day's work#
The Huper Driver app is a mobile web app: open it in your phone browser and add it to your home screen so it behaves like an installed app (that also enables push notifications). It is built to survive basements and lift lobbies: everything you do is saved on the phone first and synced to the office when signal returns.
| Your day | In the app |
|---|---|
| Arrive at warehouse | Sign in → allow location → Start Shift (pulls today's jobs) |
| Load the van | Scan every package barcode before leaving |
| Drive the route | Deliveries tab: call, navigate, deliver with photo, or fail with a reason |
| Outlet days | Outlets tab: load pallets, deliver to the outlet, confirm |
| Day done | End Shift, only after every job is resolved |
In the daily flow
Two permissions matter: Location (verifies deliveries and detects when you leave the warehouse) and Camera (scanning and proof-of-delivery photos). Grant both on first run.
Watch out
No signal? Keep working. The top bar shows sync status; queued work uploads automatically. Do not clear your browser data mid-shift: that is where unsent work lives.
Signing in#
Sign in with the phone number the office has on file: you get a one-time code, no password to remember. Email + password is the fallback.
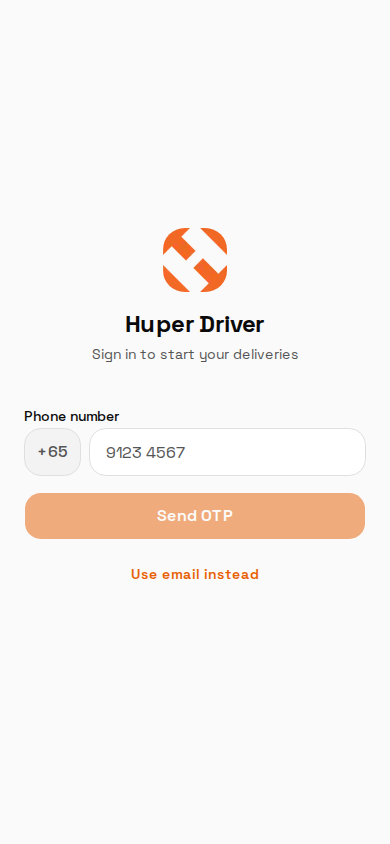
- Phone number
Singapore number, the one on your staff record. If the OTP never arrives, the office may have an old number: ask a supervisor to update it in Staff.
- Send OTP
Enabled once the number is valid. Enter the code on the next screen.
- Use email instead
Email + password fallback if your messaging is down. Same account either way.
In the daily flow
You stay signed in between days: normally you open the app and you're already on Deliveries.
Watch out
If the app bounces you to login mid-shift, sign back in promptly: queued offline work needs a valid session to upload.
Starting your day#
First screen of the morning. The app asks for location once, then one tap on Start Shift pulls everything assigned to you today: home deliveries and any outlet runs.
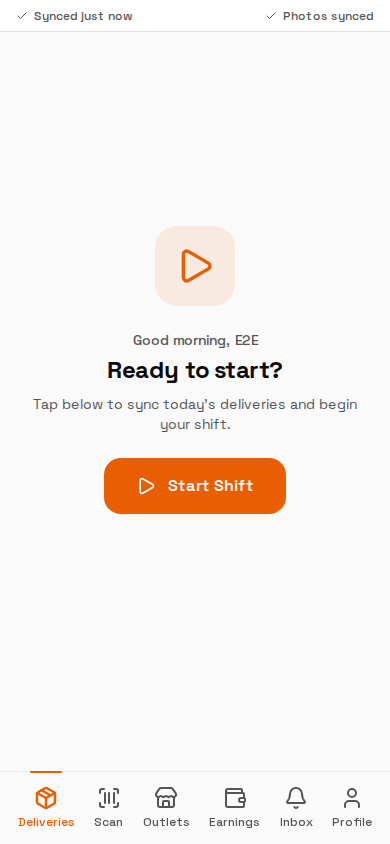
- Sync bar
Always at the top of every screen: “Synced just now” and “Photos synced”. If either shows pending items, the app is still uploading; it finishes on its own when signal returns.
- Start Shift
Downloads today's job list to your phone and marks you on duty. Do this at the warehouse, before loading: the scan step needs the list.
- Tab bar
Deliveries · Scan · Outlets · Earnings · Inbox · Profile. The orange tab is where you are.
In the daily flow
The office sees your route as “Pending Sync” until you start your shift. Starting on time is what moves your jobs into the day's flow.
Watch out
Location “while using the app” is required: it verifies deliveries and detects when you leave the warehouse. No location, no shift.
Your delivery list#
The day's jobs, grouped by time slot. This driver has one AM job and two PM jobs. Amber cards mean packages aren't scanned yet; the number chip on each card counts scanned packages against the order's total.
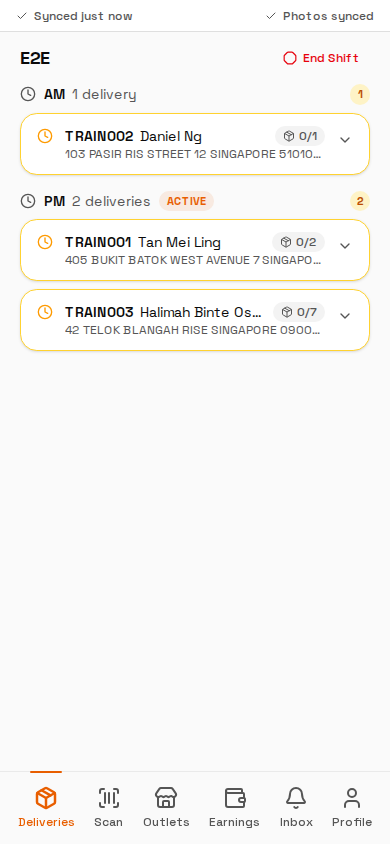
- Sync bar
Glance here after every delivery to confirm it uploaded.
- End Shift
Lives at the top all day, but use it only when everything is resolved. The app warns you if jobs are still open (see Ending your day).
- Slot sections
AM first, then PM, each with its job count. Jobs are listed in route order for your zone.
- Scan progress chip
“0/1”, “0/2”, “0/7”: packages scanned out of total. These fill in at the warehouse scan step and the card turns from amber to ready.
- ACTIVE badge
Marks the slot window you're currently in. AM jobs should be done before it flips to PM.
- Package counts
A 7-packet order is a bulky one: check the van has space before leaving, and expect a package add-on in your pay.
In the daily flow
New jobs can arrive mid-shift (the office assigns late orders). The Inbox pings you when that happens.
Working a job, before pickup#
Tap a card and it expands into everything you need: one-tap call, one-tap navigation, the exact address with unit number, and any special instructions from customer service, in orange so you can't miss them.
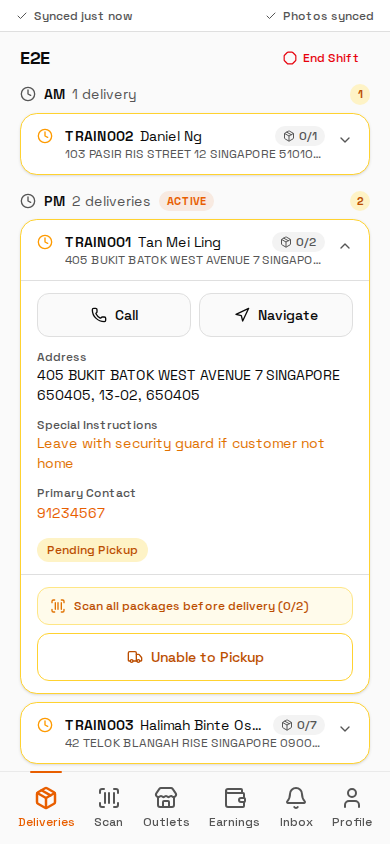
- Call
Rings the customer's primary contact directly. Call before you fail a job: a no-answer attempt is logged and protects you.
- Navigate
Opens the address in your maps app (set your preferred one in Profile). No re-typing postal codes.
- Address
Full street, block and unit. If reality disagrees with the app, tell the office: the fix happens in the POS, not by improvising.
- Special instructions
“Leave with security guard if customer not home”: delivery windows, gate codes, payment rules. Always read before ringing the bell. The office sees the same text.
- Primary contact
The number Call uses. A second contact appears here when the order has one.
- Status badge
“Pending Pickup”: this order's packages aren't scanned yet, so it can't be delivered.
- Scan reminder
“Scan all packages before delivery (0/2)”: tapping it takes you to the Scan tab. The app will not let you deliver unscanned packages.
- Unable to Pickup
If a package is missing or damaged at the warehouse, report it here with a reason. The office sees it immediately and the order is taken off your run instead of failing later.
Watch out
Don't leave the warehouse with a card still amber: you physically don't have all of that customer's boxes.
Package pickup: scan before you leave#
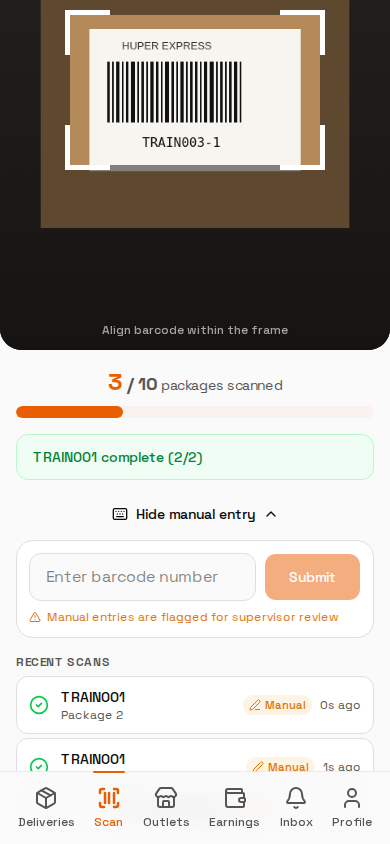
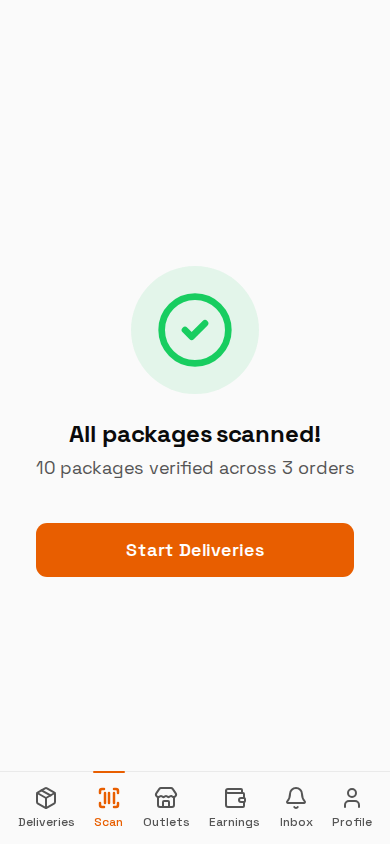
Loading the van is a scanning job. Point the camera at each package barcode; the counter tracks what's left across all your orders. Scanning is what flips a job from Pending Pickup to ready, and it's how the office knows the right boxes left on the right van.
- Camera view
Live viewfinder with an alignment frame: line the barcode up inside it. A beep and the counter dropping confirm each scan. Duplicates are ignored; a package that isn't yours is rejected with a warning.
- Progress
“3 / 10 packages scanned”: the bar counts every package across every order on your run. Zero remaining is the only acceptable state before driving off.
- Order-complete toast
“TRAIN001 complete (2/2)” pops the moment an order's last package is scanned: that card turns ready on your Deliveries list.
- Manual entry
Torn label or dead barcode: type the number printed under the stripes. Note the warning, manual entries are flagged for supervisor review, so use it as the exception, not the habit.
- Recent scans
A running receipt of what you scanned, marked Manual where you typed. The View Orders sheet shows per-order progress so you can see exactly which order is missing a packet.
- All scanned
“10 packages verified across 3 orders.” This is your green light to load up and go.
- Start Deliveries
Jumps you straight to the deliveries list with every card ready. Driving out of the warehouse geofence marks your run “out for delivery”: no button needed.
In the daily flow
Scan everything, then drive. The geofence handles the status change the moment you leave.
Watch out
Leaving with a non-zero counter means a customer's box is still on the dock. Thirty seconds of scanning saves an afternoon of “where is packet 2 of 2”.
At the door: delivering a job#
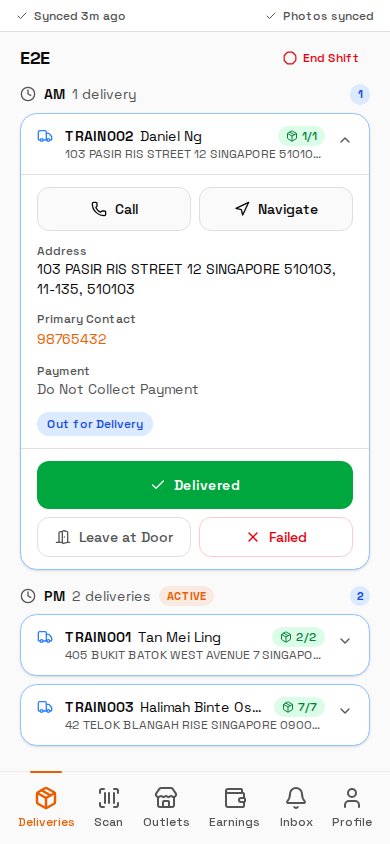
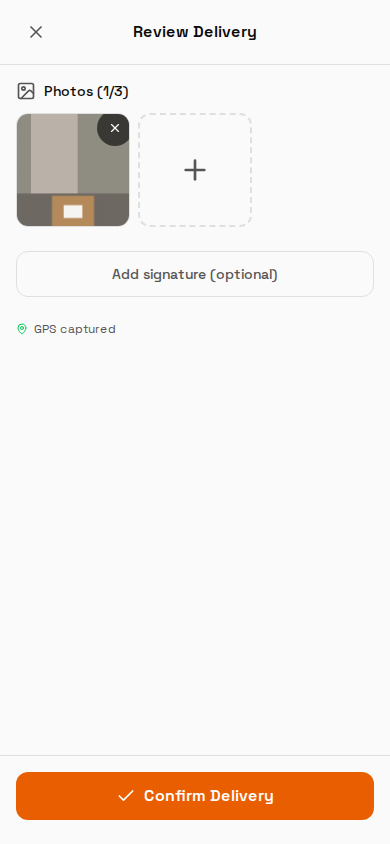
Once you're out, each expanded card offers three outcomes. Delivered walks you through proof-of-delivery: photo (up to 3), optional signature, GPS stamp, confirm. The whole flow is four taps at the door.
- Green scan chips
1/1, 2/2, 7/7: everything scanned, cards ready. The truck icon means the job is on the road.
- Out for Delivery
The status flipped automatically when you left the warehouse. The payment line above it repeats what to collect; here “Do Not Collect Payment” (prepaid order).
- Delivered
The big green button: tap when the customer has the package. It opens the camera for the proof photo.
- Leave at Door
For “leave with guard / at riser” instructions: same photo flow, recorded as a leave-at-door delivery so the office knows nobody signed.
- Failed
Can't deliver? This starts the failure flow (next section): photo plus a reason. Call the customer first.
- Photos (1/3)
The doorstep photo you just took, with room for two more (parcel + unit door is a good pair). Retake by removing and shooting again.
- Signature
Optional: collect it for high-value orders or when the customer offers.
- GPS captured
The app stamps where you are when confirming: this is why Location stays on. It's your proof you were at the address.
- Confirm Delivery
Saves everything, marks the job green, syncs to the office in seconds, and your payout row is created automatically.
In the daily flow
Photo → confirm → next stop. The office can see the POD photo on the order within seconds of your confirm.
Watch out
If there is CASH to collect, count it before you confirm: the balance on the card is what the office expects you to hand in.
When you can't deliver#
A failed job still needs evidence and a reason: the office (and sometimes the customer) reads exactly what you choose. Photo first, then one of four reasons, then confirm.
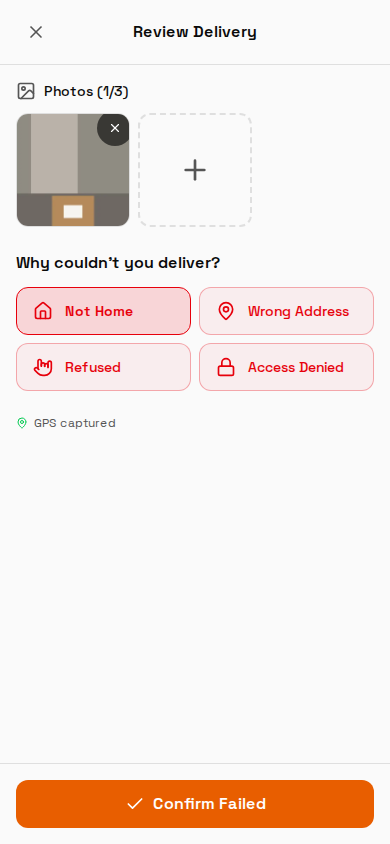
- Photo of the attempt
Shoot the closed door, the gate, the blocked access: whatever tells the story. Same 3-photo limit as a delivery.
- Not Home / Refused
“Not Home” only after calling: the call is logged next to the failure. “Refused” means the customer declined the package.
- Wrong Address / Access Denied
“Wrong Address” flags the order for the office to fix at source. “Access Denied” covers guardhouses and locked estates.
- GPS captured
Your position is stamped on the failure too: proof you actually attempted the address.
- Confirm Failed
Disabled until a reason is picked. On confirm, the job turns red, the office sees it in Failed Jobs immediately, and it becomes redelivery work.
Watch out
A failure without a call attempt logged doesn't hold up when the customer complains. Call, wait, photograph, then fail.
Reading your list mid-shift#
The list is your live scoreboard. Green cards are done (with their POD accessible), truck icons are on the road, and the count badges per section tell you what's left.
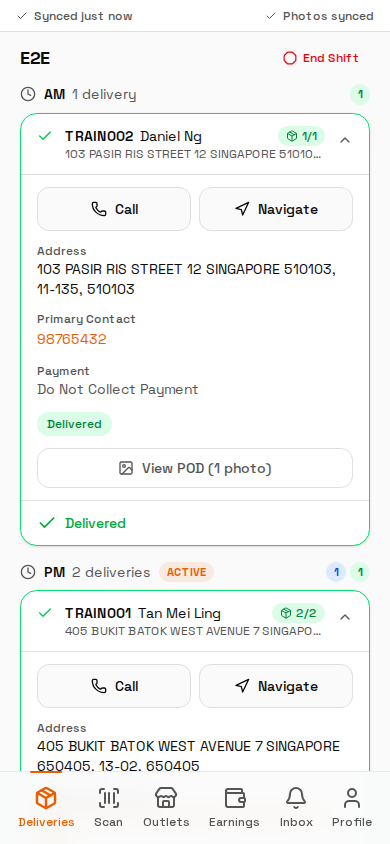
- Delivered card
Green border + check. The AM section badge has turned green too: AM is cleared.
- Payment line
Stays visible after delivery (“Do Not Collect Payment”) so any later dispute starts from what the app told you.
- Status
The badge inside the card reads Delivered with the timestamp synced to the office.
- View POD
Reopen your own proof photos any time: useful when the office calls about a delivery from an hour ago.
- Remaining work
PM shows 2 deliveries with 1 delivered, 1 to go. When every section badge is green, you're ready for End Shift.
Outlet runs: restocking day#
On days the weekly roster gives you outlet restocking runs, they appear here. Each run is a two-step job: load pallets at the warehouse (with photos), then deliver and confirm at the outlet.
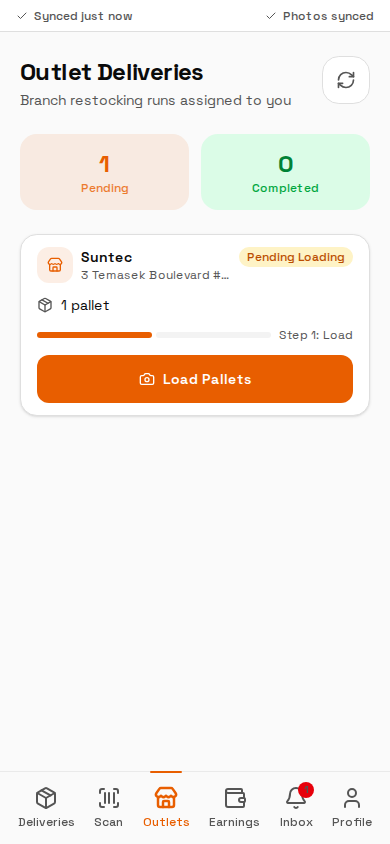
- Pending
Runs assigned to you today that aren't done. They count on the office dashboard too: they're not optional extras.
- Completed
Turns green as you confirm each outlet.
- Pending Loading badge
This run is at step 1: nothing loaded yet. The progress bar under the outlet name tracks the steps.
- Pallet count
How much you're carrying for this outlet. Multi-trip days show a trip number.
- Load Pallets
Opens the camera to photograph the loaded pallets: same photo discipline as POD, so there's proof of what left the warehouse.
In the daily flow
Outlet runs are paid separately from home deliveries. Completing them properly matters for your month-end total.
Watch out
The refresh icon re-pulls today's runs: use it if a supervisor says they've just rostered you an outlet.
Earnings: your pay, live#
Your delivery pay in the same app you work in. The top card is your latest payout period; the tiles split deliveries from outlet trips; the daily breakdown fills in as you deliver.
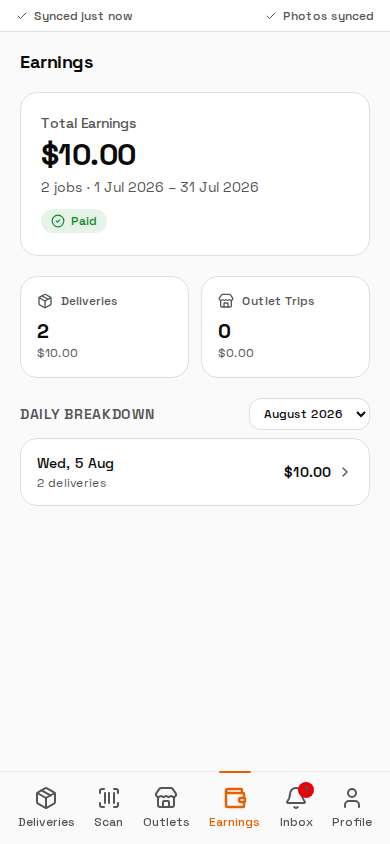
- Period card
Your most recent payout period with its status. Paid means the money has been settled. Totals combine base pay and adjustments.
- Deliveries tile
Count and dollars from door-to-door deliveries: base rate per delivery plus area surcharges and big-order add-ons.
- Outlet trips tile
Outlet runs are counted and paid separately at their own rates.
- Month picker
Flip between months to compare or to check an old payslip query.
- Daily breakdown
One row per working day. Tap a row for the per-delivery detail behind the number.
In the daily flow
Rows appear as soon as a delivery is confirmed: you can sanity-check your day on the drive back.
Watch out
Only delivered jobs pay. Think a number is off? Every delivery has a photo and timestamp on file. Raise it with your supervisor and it's checked in minutes.
Inbox: how the office reaches you#
New job assignments, route changes and messages land here. The unread dot on the bell badge follows you across the app. Install the app to your home screen and these also arrive as push notifications.
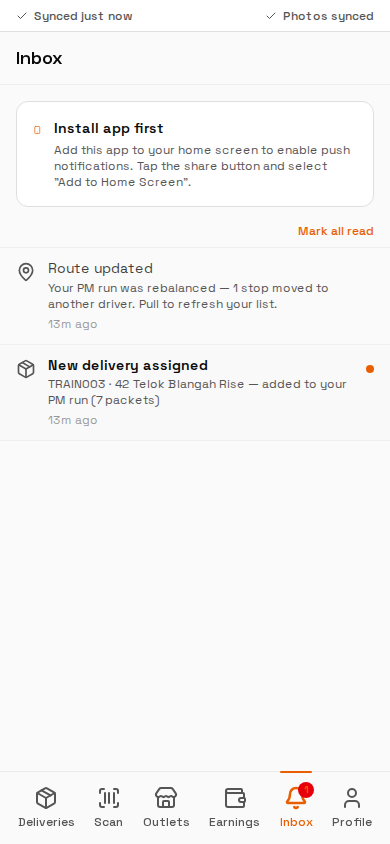
- Install app first
The banner walks you through Add to Home Screen. Installed = push notifications for new jobs even with the browser closed.
- Mark all read
Clears the unread state once you've caught up.
- Route updated
A rebalance notice: a stop was moved to another driver. Pull-refresh your Deliveries list when you see one of these.
- New delivery assigned
A mid-shift addition with the tracking number, area and packet count. The orange dot marks it unread; tapping it jumps to Deliveries.
- Unread badge
The count rides on the bell icon on every screen, so a new message never waits until you happen to open the Inbox.
Watch out
Notifications also arrive on WhatsApp from the Huper Support number: that channel works even before you install, but install anyway.
Profile: make the app yours#
Your details as the office has them, plus the two settings drivers actually change: which maps app Navigate opens, and light/dark theme.
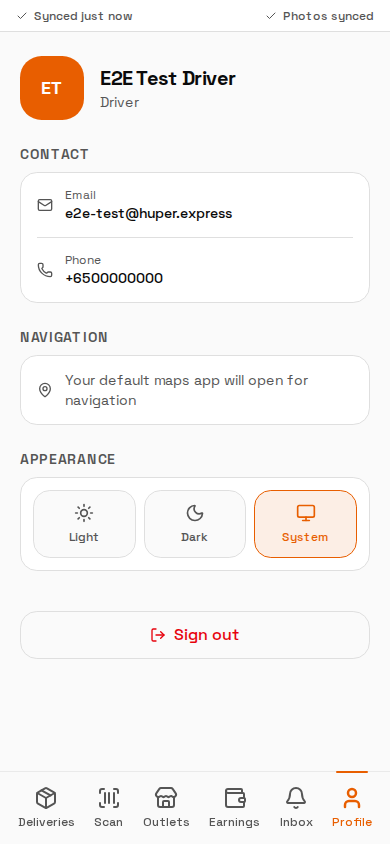
- Contact
The email and phone on your staff record. The phone is also your OTP login and WhatsApp channel. Wrong? Tell a supervisor; it's fixed in the CRM Staff screen.
- Navigation
Your default maps app is what every Navigate button opens: Google Maps, Waze, Apple Maps, your call.
- Appearance
Light, Dark, or follow the phone. Dark is easier on the eyes for 05:30 starts.
- Sign out
Rarely needed: sessions persist. Sign out only on a shared or replaced phone.
Ending your day#
End Shift checks your list before it lets you go. This capture shows the warning state: one home delivery and one outlet run are still open, and the dialog says exactly what confirming would do: mark them failed. Resolve them instead, then end.
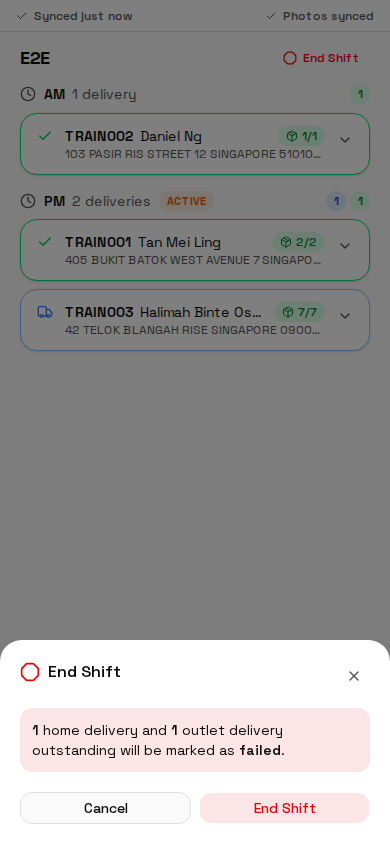
- The check
End Shift always tallies your day first. All clear → “You can safely end your shift.” Anything open → this warning.
- The warning
“1 home delivery and 1 outlet delivery outstanding will be marked as failed.” Failed means no pay for those jobs and a redelivery for the customer. Don't end past it casually.
- Cancel
The right answer 99% of the time: go back, finish or properly fail the open jobs, then end.
- End Shift (confirm)
For the rare legitimate case (van breakdown, supervisor instruction). The outstanding jobs fail with an auto-close reason the office reviews next morning.
In the daily flow
Forgot to end your shift? The system rolls the day over automatically at midnight, so a missed End Shift never blocks tomorrow. Resolving every job is still on you: whatever is left open gets auto-closed as failed.
The golden rules#
Seven habits that make the whole system work.
| # | Rule | Why |
|---|---|---|
| 1 | Start Shift at the warehouse, not from home. | Your jobs and scans need the list loaded before the van is. |
| 2 | Scan every barcode before leaving. Zero remaining. | Short scans are lost packets and afternoon phone calls. |
| 3 | Read the orange instructions before ringing the bell. | Gate codes, delivery windows and payment rules live there. |
| 4 | Call before you fail a job. | The call is logged; “Not Home” without one doesn't hold up. |
| 5 | Photo every delivery, collect every balance. | The photo is your proof; the balance is the company's cash. |
| 6 | Keep location on, don't clear the app's data mid-shift. | GPS stamps prove your work; the app's storage holds unsent work in dead zones. |
| 7 | Resolve every job before End Shift. | Whatever the warning dialog fails earns nothing and fails a customer. |